

10 AI Prompts for Natural Double-Chin Removal—with Before-and-After Results

Founder of Promptsref
Founder of Promptsref and AI UGC creator focused on practical generative AI workflows, prompt engineering, and creator education, with an audience of more than 40,000 across social platforms.
In this article
Sometimes a photo you love needs only a small adjustment under the chin. You want to keep the smile, the familiar face, and the people beside you without ending up with the look of a heavy beauty filter.
A useful double-chin removal prompt does more than name what to remove: it spells out what needs to stay. These ten tested prompts cover different shooting situations, with the generated original and its actual AI edit shown together.
In a Reddit wedding-photo retouching request, commenters appreciated versions that kept the bride looking like herself and criticized edits that stretched her neck. Apply the same check to an AI edit: look at the whole person first, then decide whether the chin looks natural.
How to use these prompts on your own photos
- Upload a clear original. Choose a photo that shows the chin, upper neck, and nearby collar or jewelry. Repeated screenshots and heavy compression lose the skin detail you need to judge a natural edit.
- Use the photo as a reference. In the image-to-image generator, choose Add reference image and a model that accepts image input. Without the original, the model has no specific photograph to preserve.
- Choose the closest scenario. Match the lighting and angle, then replace clothing and position details with what is in your photo. Keep the original aspect ratio; we selected 4:3 for these examples.
- Generate once, then check the details. Compare the eyes, mouth, face width, neck length, and background before focusing on the chin. If the face has changed, go back to the original instead of building another edit on top of it.
When adapting a prompt, use this structure: person to edit + specific change under the chin + strength of the edit + details to preserve. For example: “Slightly reduce the fold under the chin of the center person in green; keep their face width, smile, neck length, skin texture, and both companions unchanged.”
The AI Prompt Generator can turn your description into a structured editing instruction; we used it to prepare all ten prompt pairs here. If you already have a photo, copy the editing prompt; the collapsed creation prompt is only for recreating our fictional test subject.
Choose a prompt for your photo
Every “before” image depicts an AI-generated fictional adult. Each edit uses its matching original as the reference; these examples show photo retouching, not a physical transformation or a cosmetic treatment.
The ten scenarios cover common situations worth trying. We have kept the exact English prompts used in the test and noted where the results did not fully follow the instructions.
Test settings: Promptsref’s model labeled GPT Image 2.5 Sunburst, 1K, 4:3, with one matching reference image per edit. The site watermark is retained; actual pixel dimensions varied between outputs even with the same 1K setting.
1. Everyday portraits: start with a small adjustment
Use this for a simple portrait with a relaxed expression. Replace “woman” and “beige background” as needed, while keeping the limits on face width and natural shadow under the chin.
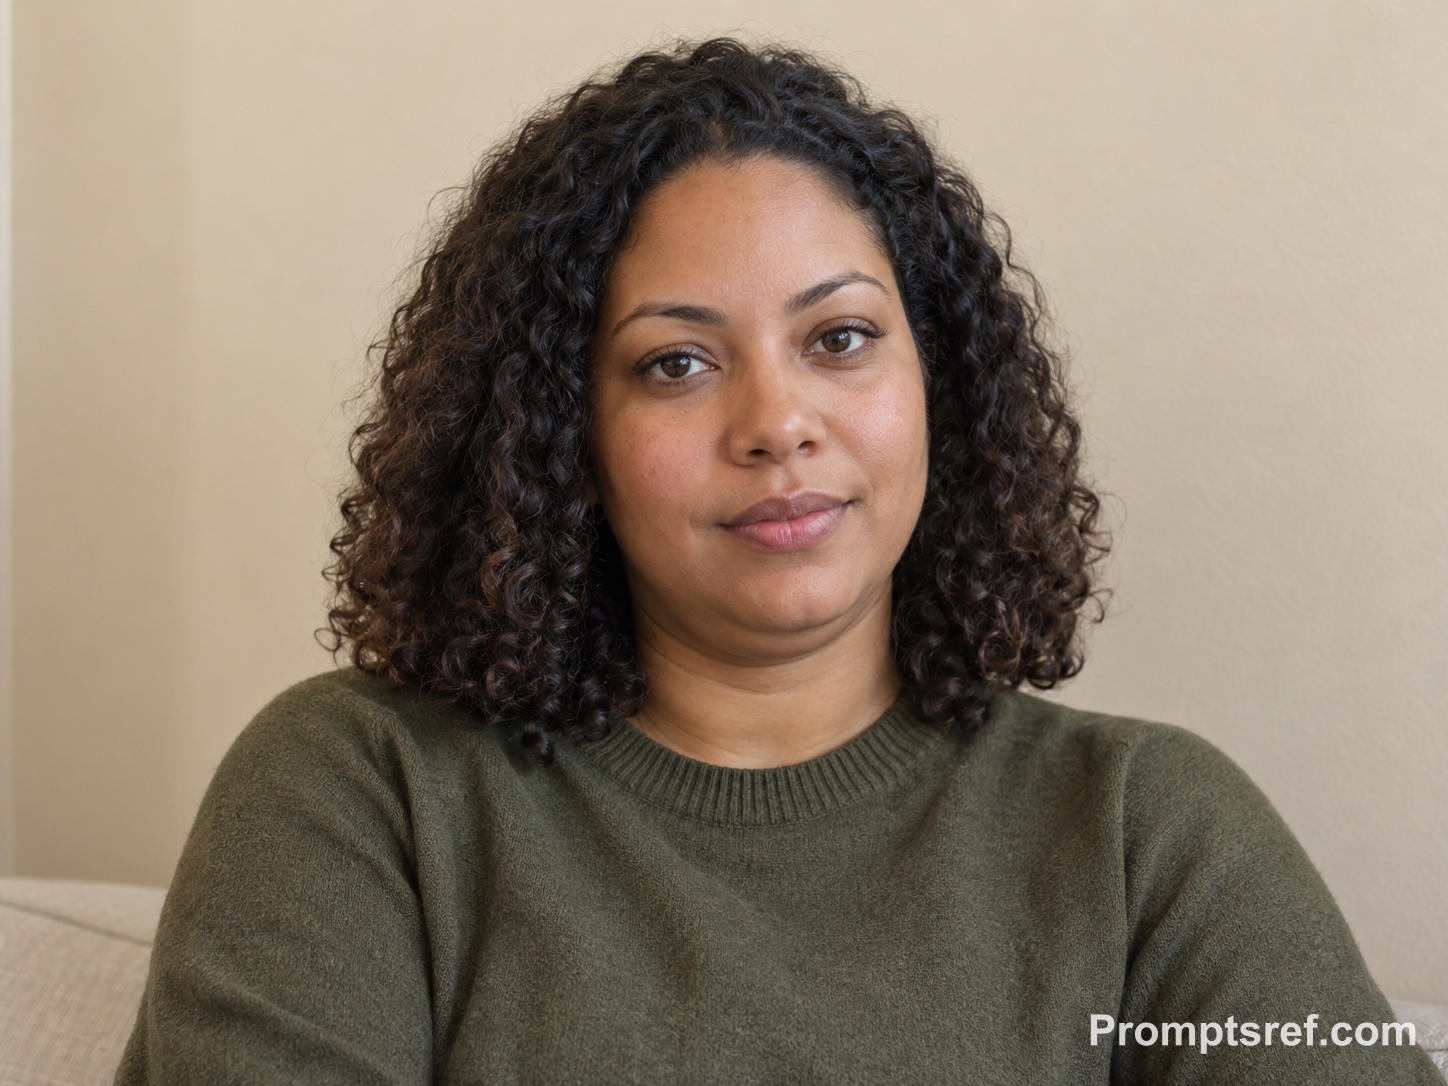
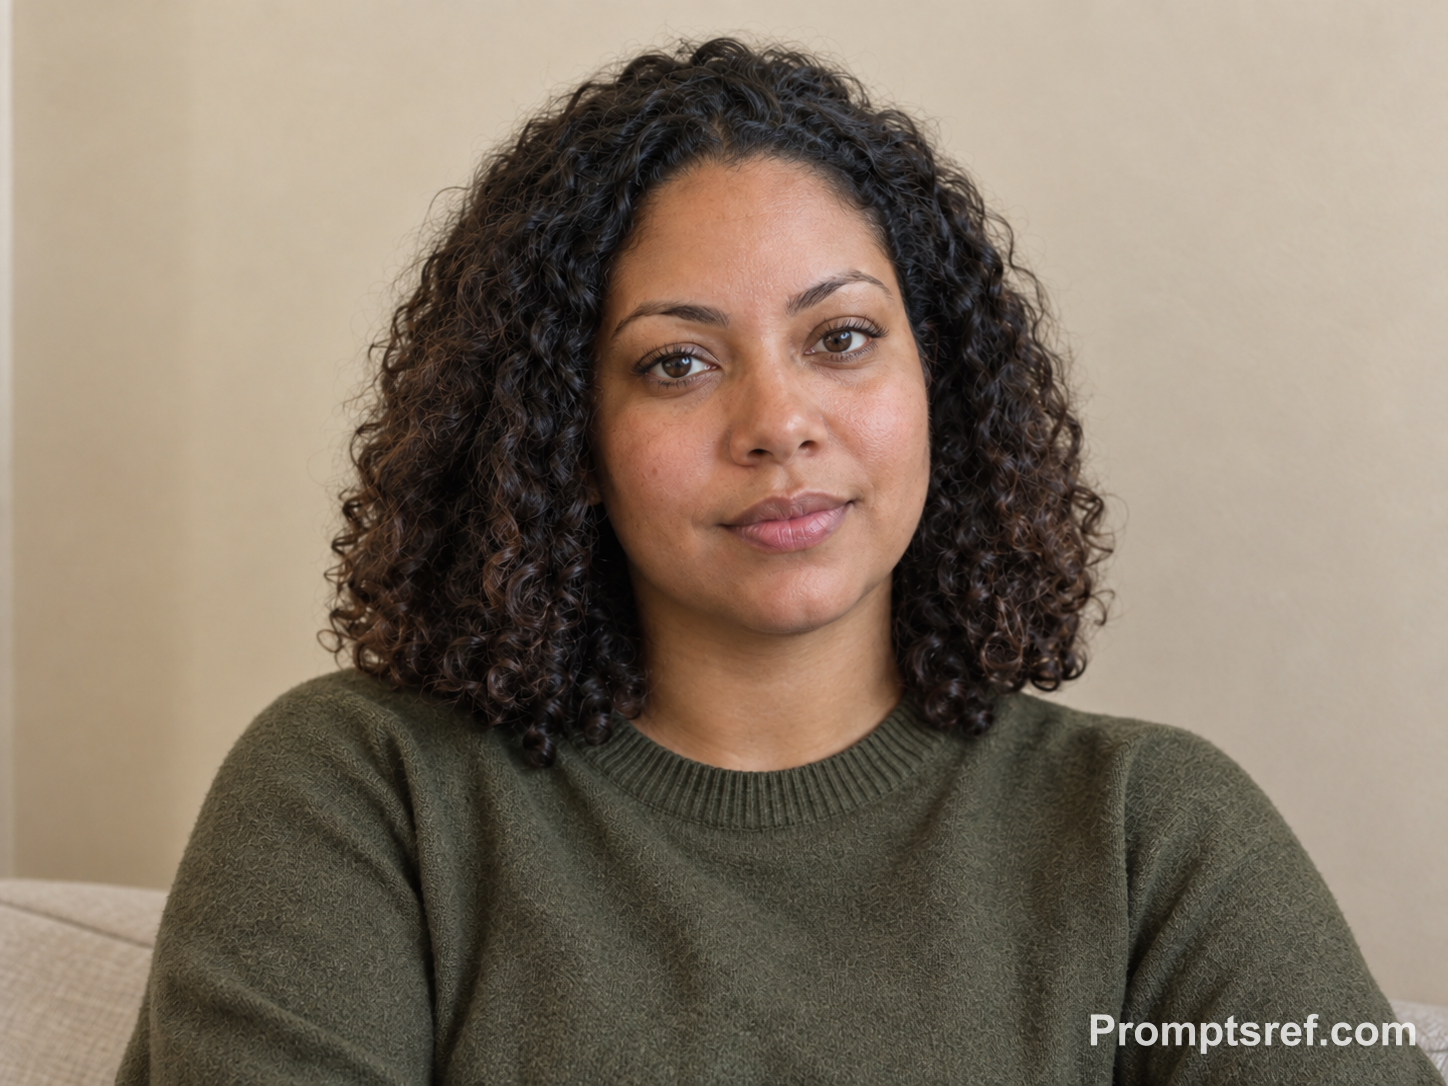
What happened in our test: The second fold under the chin is noticeably reduced, while the curls, closed-mouth expression, and sweater remain recognizable. The neck looks smoother and small skin and fabric details have been redrawn, so inspect the overall texture as well as the contour.
Copy the tested editing prompt:
Using this exact before image, remove only the secondary under-chin fold beneath the chin. Preserve the woman’s identity, facial features, face width, chin projection, neck length, age, body size, hairstyle, clothing, pose, expression, lighting, camera perspective, and beige background. Keep ordinary pores and skin texture, with an anatomically plausible neck contour and some natural shadow remaining under the chin. Do not slim the overall face or alter any other feature.
Show the prompt used to create the fictional original
Create a realistic fictional adult woman in her early thirties, seated against a softly lit beige wall for a neutral everyday portrait. She has medium-brown skin, shoulder-length natural curls, an olive crew-neck sweater, relaxed posture, and a calm closed-mouth expression. Show a clearly visible but ordinary secondary double-chin fold beneath her chin, with natural skin texture, realistic neck anatomy, soft window lighting, and a simple uncluttered background. Horizontal 4:3 composition.
2. Low-angle selfies: keep the original perspective
A phone held below the face can make an under-chin fold more prominent. Keep that viewpoint in the edit: if you also ask for an eye-level angle, it becomes difficult to tell whether the model adjusted the chin or rebuilt the whole head.
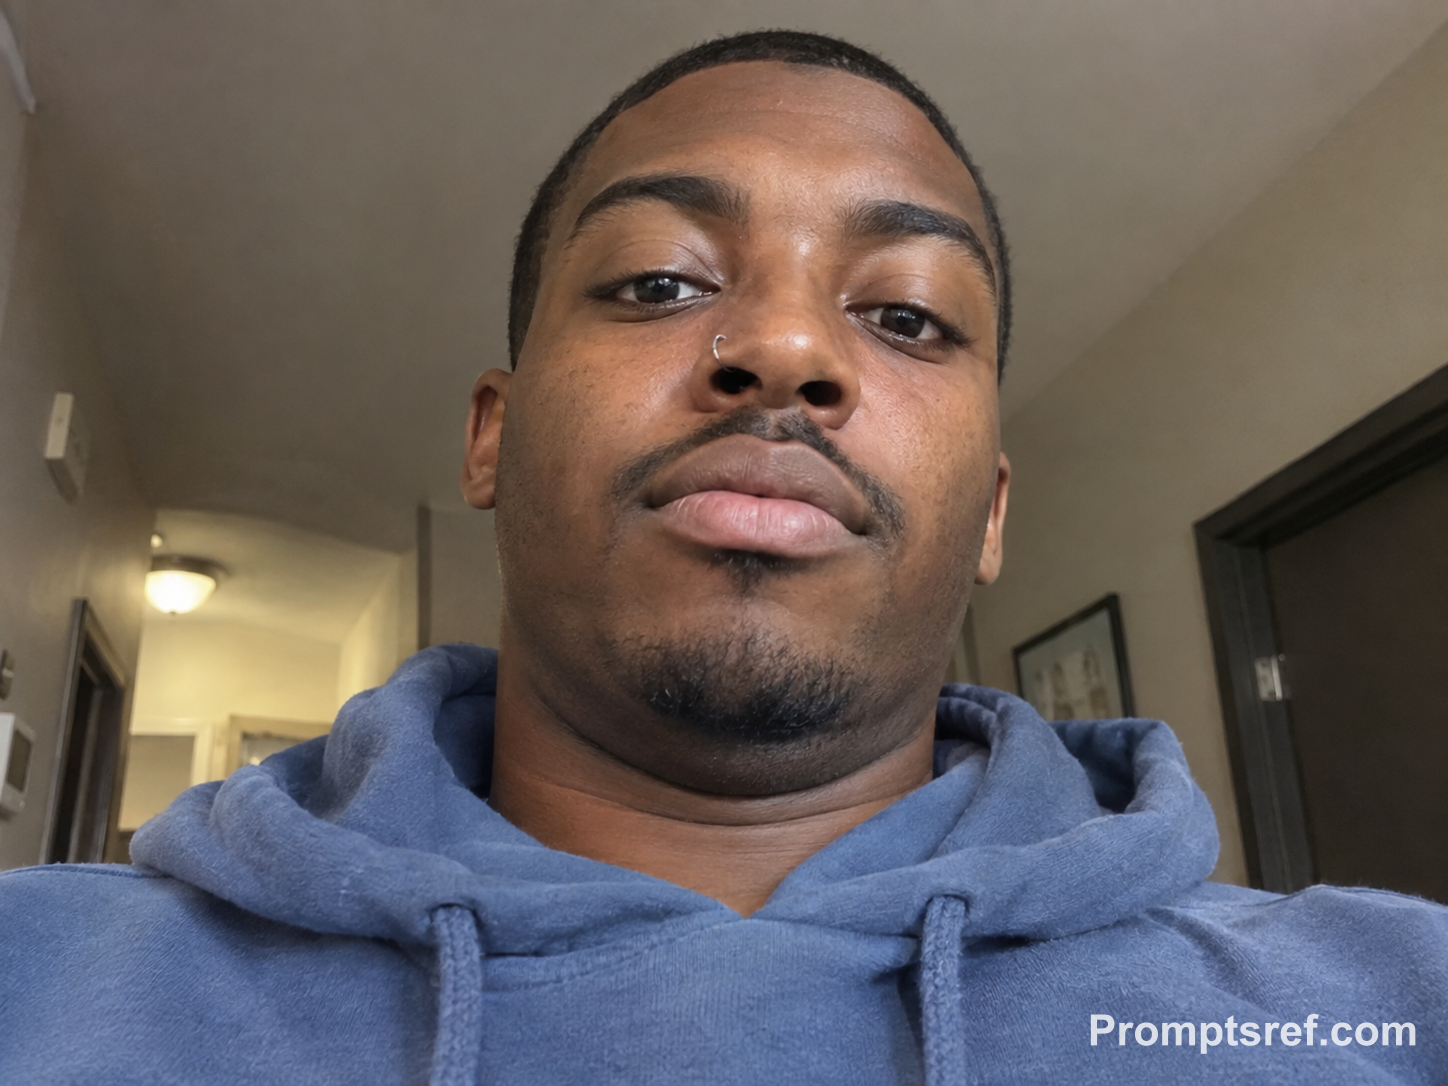
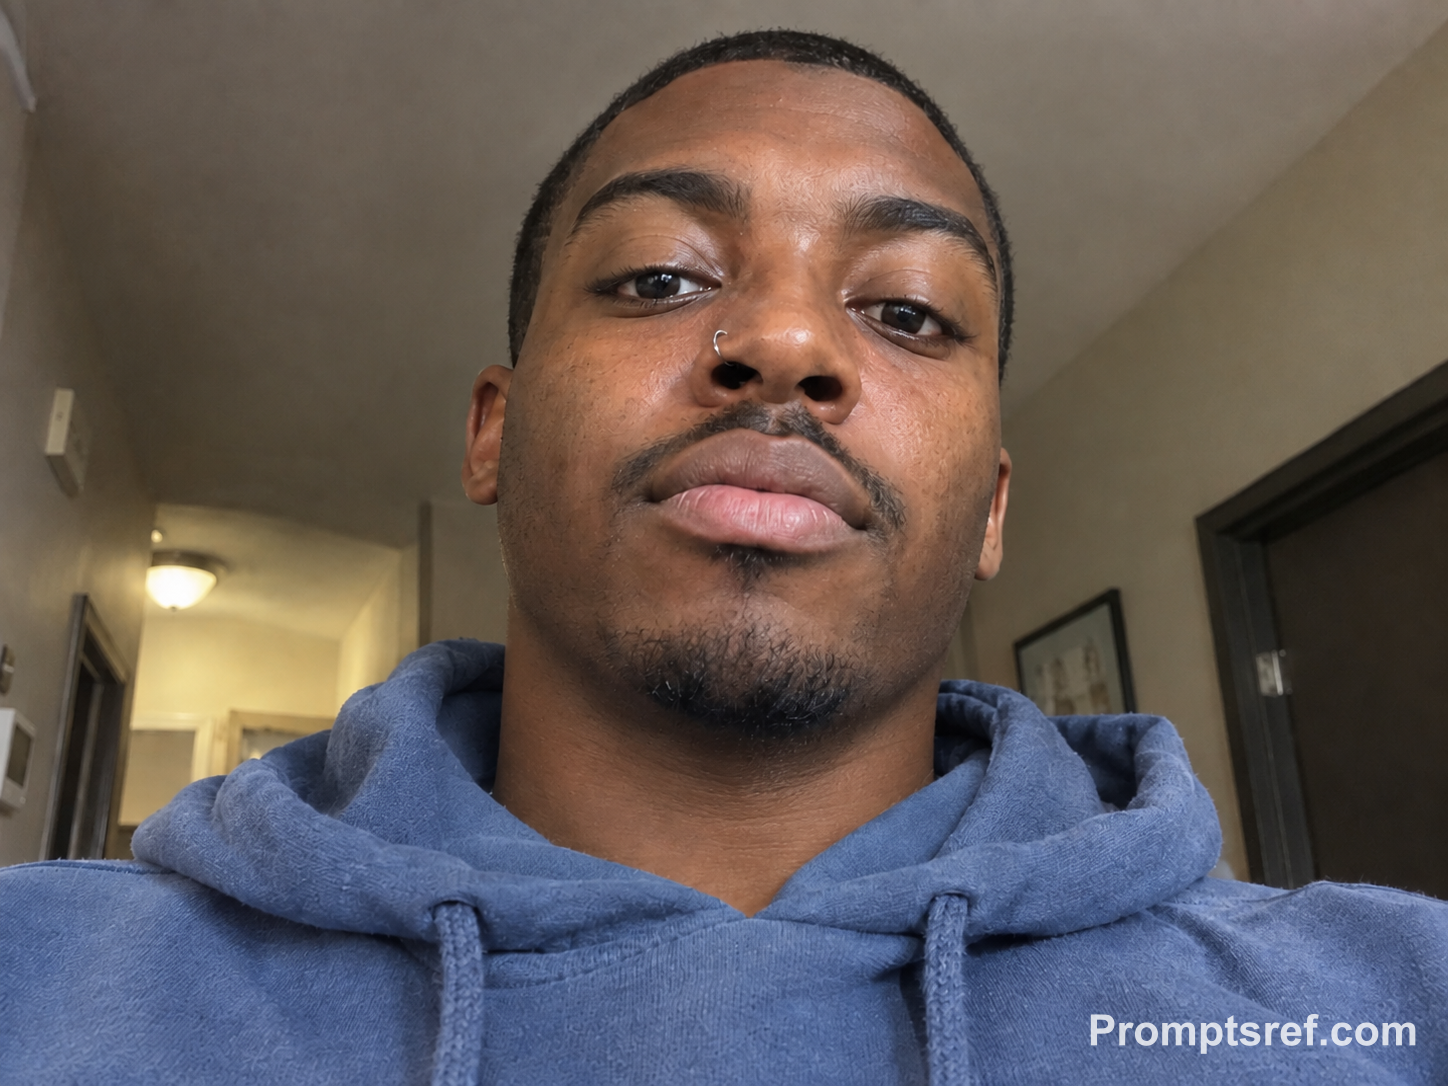
What happened in our test: The horizontal fold above the hoodie is reduced, with the low-angle selfie perspective still intact. The neck texture is smoother too, so compare this area closely if you want to retain more of the original creases.
Copy the tested editing prompt:
Using this exact before image, remove only the secondary under-chin fold visible from the low-angle selfie perspective. Preserve the man’s identity, facial proportions, face width, chin projection, neck length, age, body size, hairstyle, nose ring, hoodie, pose, expression, phone perspective, lighting, and apartment hallway. Retain realistic pores and a plausible natural shadow beneath the chin. Do not change the jawline broadly, slim the face, or modify the background.
Show the prompt used to create the fictional original
Create a realistic fictional adult man in his late twenties taking a low-angle phone selfie from slightly below face level. He has dark skin, closely cropped hair, a small nose ring, and a faded blue hoodie. His eyes look into the phone with a neutral, mildly curious expression. The low perspective clearly shows an ordinary secondary double-chin fold, natural skin texture, realistic indoor hallway lighting, slight phone-camera perspective, and a softly blurred apartment background. Horizontal 4:3 composition.
3. Wedding smiles: keep the expression relaxed
For a candid laugh, check the smile before the chin. Compare the mouth corners, cheek creases, and earrings before deciding to keep the result.
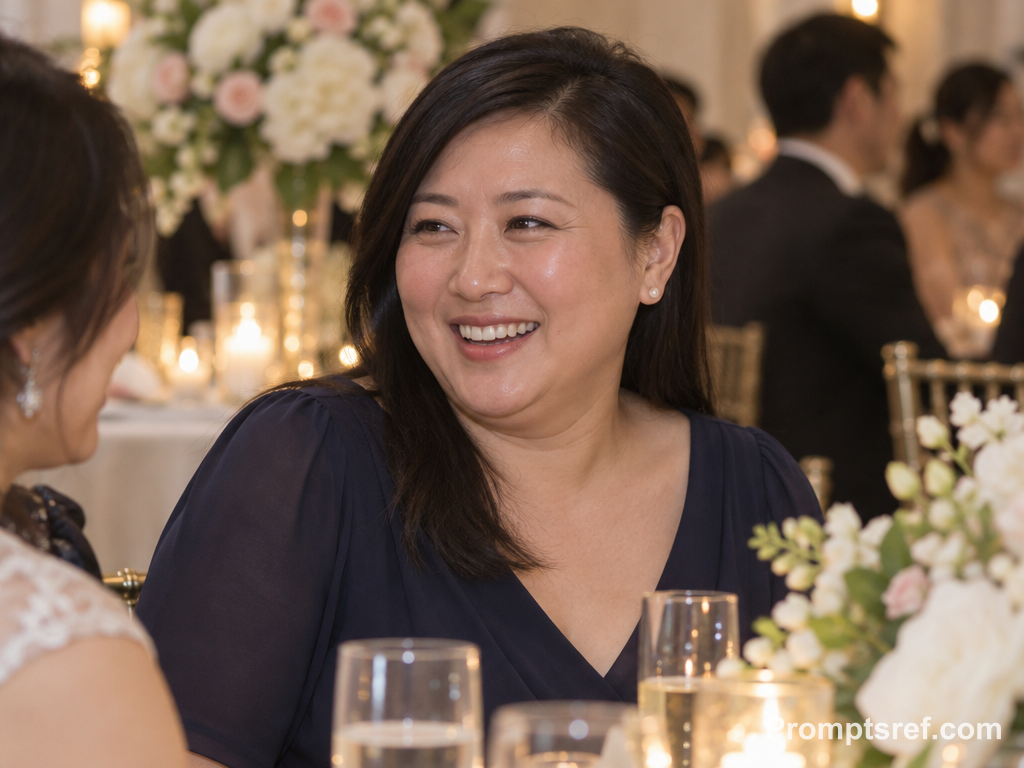
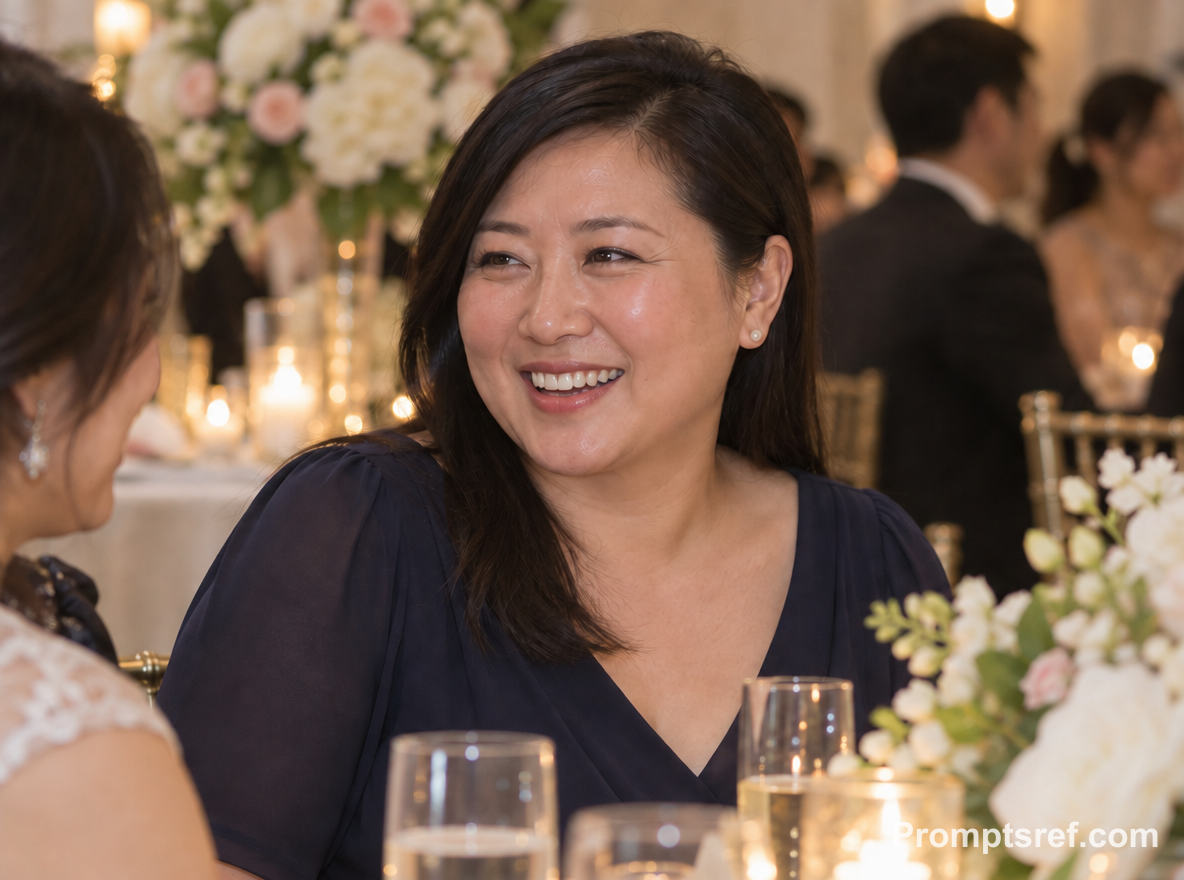
What happened in our test: The smile, pearl earring, and reception lighting remain visually consistent while the under-chin fold recedes. The upper neck is also smoother: the model softened the transition from chin to neck rather than simply erasing one line.
Copy the tested editing prompt:
Using this exact before image, remove only the secondary under-chin fold beneath the smiling guest’s chin. Preserve her identity, smile, facial expression, face width, chin projection, neck length, age, body size, pearl earrings, hairstyle, navy dress, pose, warm reception lighting, floral background, and camera framing. Keep natural smile lines, pores, and a believable small shadow under the chin. Do not change makeup, facial shape, body proportions, or clothing.
Show the prompt used to create the fictional original
Create a realistic fictional adult East Asian woman in her forties attending a wedding reception, smiling naturally toward a nearby friend. She wears a navy dress, small pearl earrings, and her straight black hair is tucked behind one ear. Frame her from the chest up beside softly glowing floral decorations. Show a clearly visible but ordinary secondary double-chin fold while preserving natural smile lines, skin texture, warm indoor lighting, and realistic candid detail. Horizontal 4:3 composition.
4. Professional headshots: use the collar as a reference
The shirt collar gives you a fixed point when checking a headshot. If the distance from the chin tip to the collar grows noticeably, the model may have lengthened the neck while reducing the fold.


What happened in our test: The fold above the shirt opening is reduced, and the glasses and collar remain clearly defined. Several natural neck lines also fade; lower the editing strength if those are details you want to keep.
Copy the tested editing prompt:
Using this exact before image, remove only the secondary under-chin fold while keeping the man’s identity completely consistent. Preserve his glasses, salt-and-pepper hair, facial features, face width, chin projection, neck length, age, body size, shirt collar, blazer, posture, expression, professional lighting, office background, and framing. Maintain natural pores, skin texture, and an anatomically plausible modest shadow beneath the chin. Do not sharpen, retouch, beautify, or globally slim his face.
Show the prompt used to create the fictional original
Create a realistic fictional adult Black man in his fifties for a corporate headshot, wearing a light-blue button-up shirt with the collar visible beneath a charcoal blazer. He has short salt-and-pepper hair, rectangular glasses, and a composed expression. Photograph him against a softly lit cool-gray office background. Show a clearly visible but ordinary secondary double-chin fold, authentic skin texture, subtle under-chin shadow, professional lighting, and a straight-on chest-up pose. Horizontal 4:3 composition.
5. Side portraits: preserve the nose, lips, and chin tip
In a side or three-quarter portrait, use the nose tip, lips, chin tip, and visible ear as reference points. Moving the chin forward changes the profile, so keep that separate from reducing the fold beneath it.


What happened in our test: The small fold under the chin is reduced, with the nose, lips, ponytail, and wall in similar relative positions. The jaw-to-neck boundary looks more defined; inspect that edge if you prefer a softer transition.
Copy the tested editing prompt:
Using this exact before image, remove only the secondary under-chin fold visible in the three-quarter view. Preserve her identity, profile landmarks, face width, chin projection, neck length, age, body size, ponytail, burgundy blouse, pose, gaze, expression, afternoon lighting, wall texture, and camera angle. Retain natural skin pores and a plausible contour with mild residual shadow beneath the chin. Do not straighten the face, alter the nose or lips, or perform overall slimming.
Show the prompt used to create the fictional original
Create a realistic fictional adult Middle Eastern woman in her early forties, photographed in a three-quarter side portrait while looking slightly past the camera. She has warm olive skin, a loose burgundy blouse, and dark hair gathered in a low ponytail. Use soft afternoon light beside a pale textured wall. Clearly show an ordinary secondary double-chin fold from this angle, with realistic facial structure, natural skin texture, relaxed posture, and a quiet expression. Horizontal 4:3 composition.
6. Short beards: keep the individual hairs
Zoom in on the lower beard edge after editing. If it has become a flat patch of dark color, return to the original and explicitly ask to retain individual hairs and their direction.
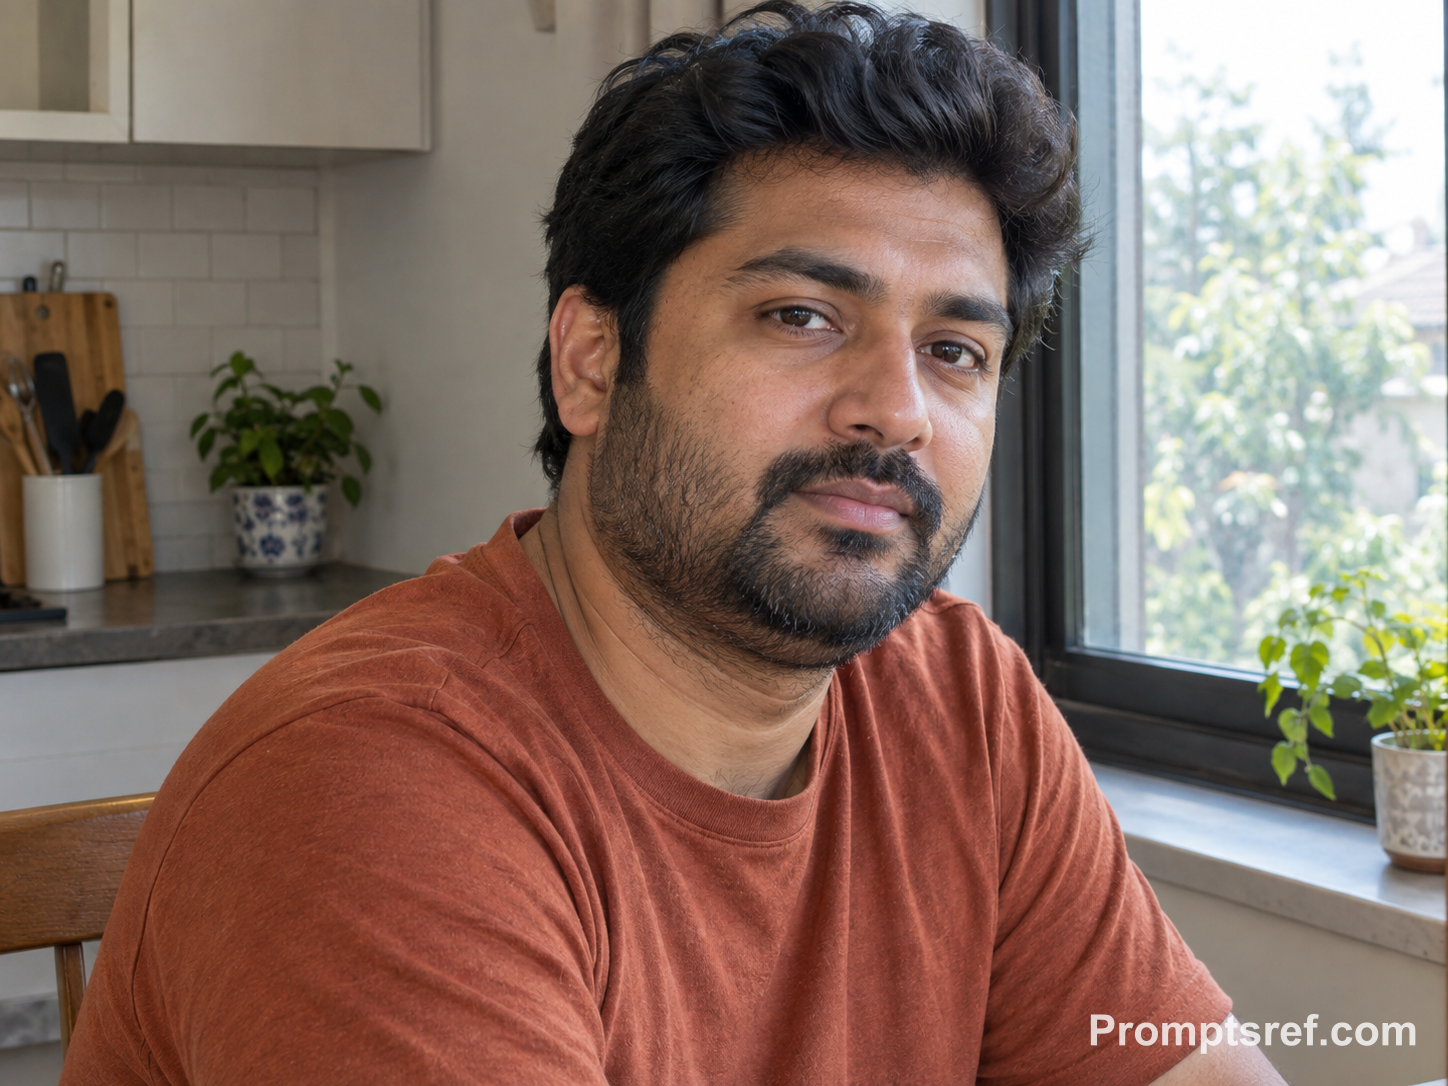
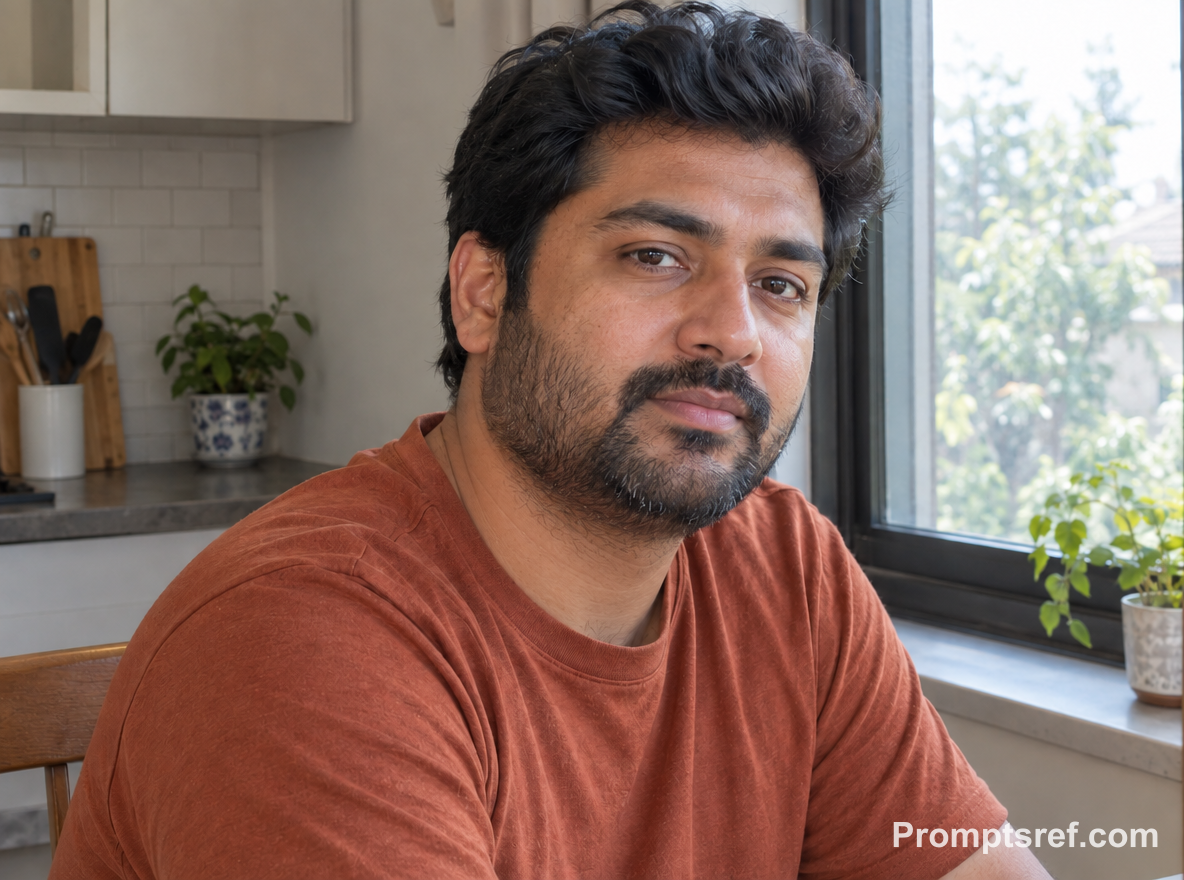
What happened in our test: The fold beneath the beard softens, while the short hairs and window light remain recognizable. This is a restrained adjustment; check that the beard edge is still clear before asking for a stronger reduction.
Copy the tested editing prompt:
Using this exact before image, remove only the secondary under-chin fold beneath the bearded man’s chin. Preserve his identity, beard shape and individual hairs, facial features, face width, chin projection, neck length, age, body size, hairstyle, T-shirt, posture, expression, window light, and kitchen background. Keep realistic pores, beard texture, and an anatomically plausible soft shadow under the chin. Do not erase the beard, reshape the jaw broadly, or alter the face.
Show the prompt used to create the fictional original
Create a realistic fictional adult South Asian man in his mid-thirties with a short, neatly uneven beard and thick dark hair. He wears a plain rust-colored T-shirt and sits near a kitchen window, turned slightly toward the camera with a thoughtful neutral expression. Make the ordinary secondary double-chin fold clearly visible beneath the beard line, while preserving individual hairs, natural skin texture, realistic daylight, and a lived-in but uncluttered background. Horizontal 4:3 composition.
7. Older faces: distinguish the target fold from neck lines
Specify the one fold directly beneath the chin and ask to keep the other lines. A broad instruction such as “smooth the entire neck” gives the model too much scope when you want a small contour change that preserves the person’s age.
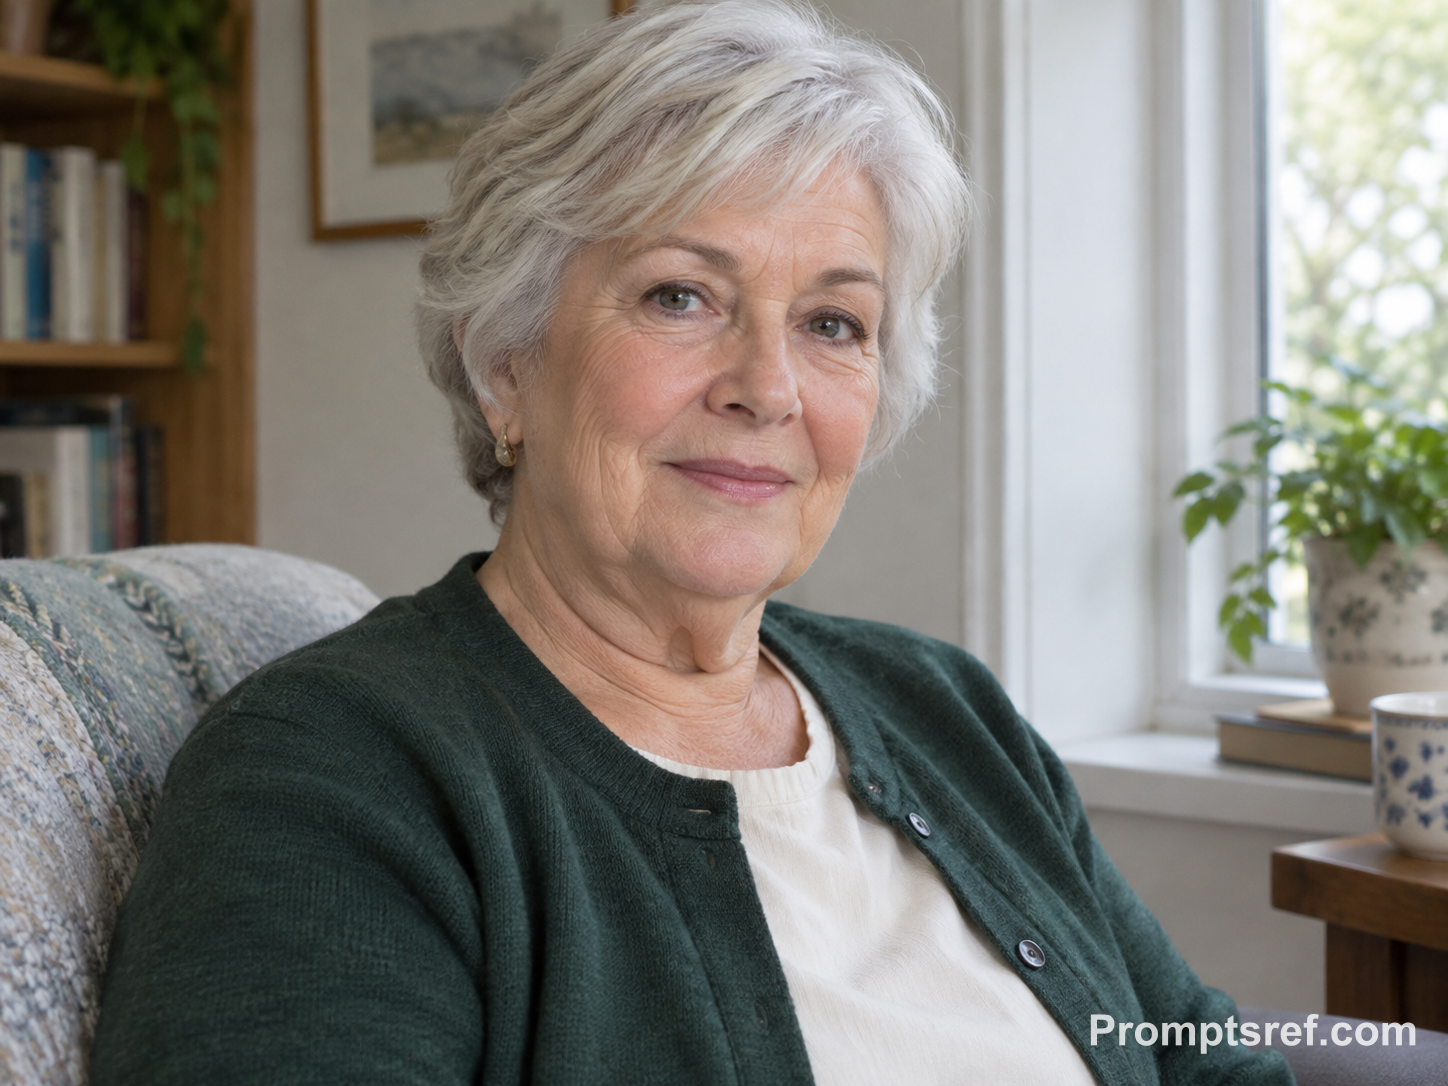
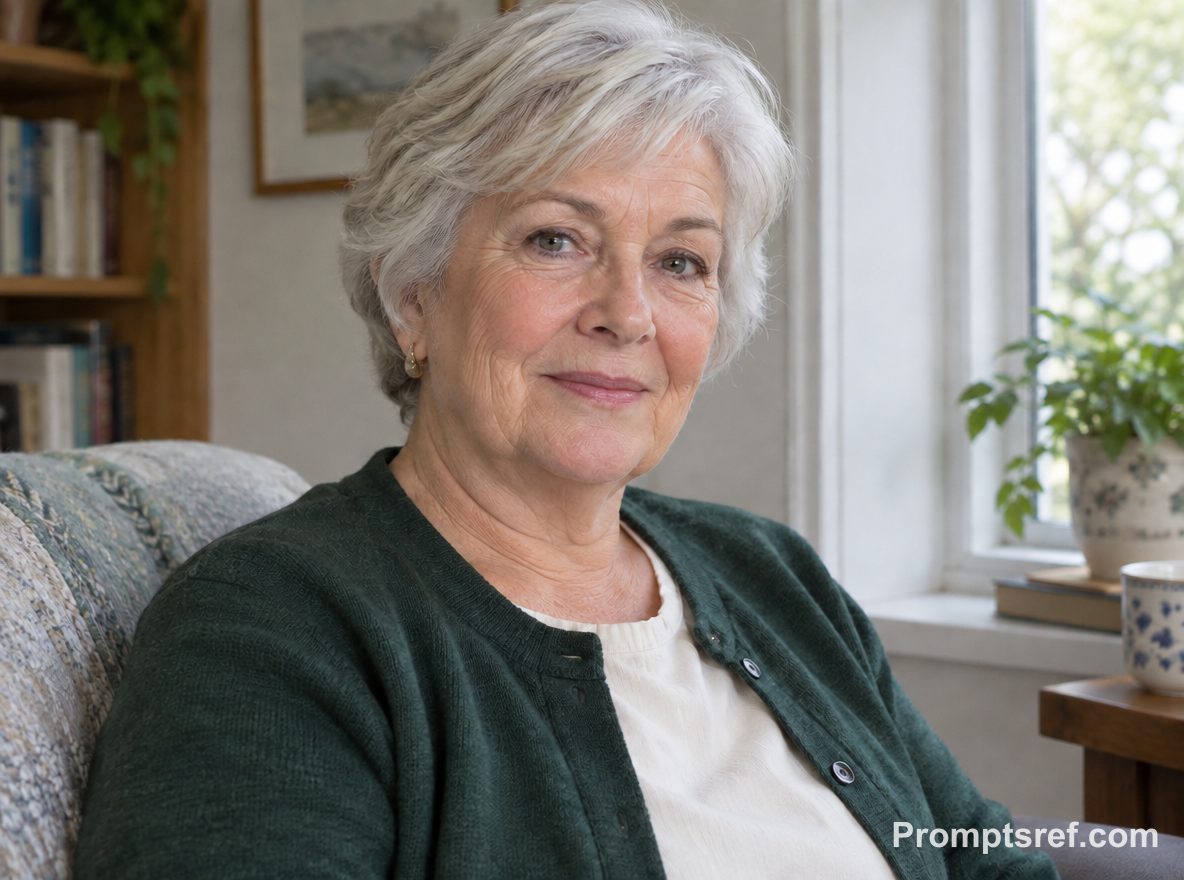
What happened in our test: The central fold is reduced, while crow’s-feet and much of the natural neck texture remain visible. Nearby skin has still been redrawn slightly, showing how difficult it is to isolate a fold completely with text instructions alone.
Copy the tested editing prompt:
Using this exact before image, remove only the secondary under-chin fold beneath the older woman’s chin. Preserve her identity, age, silver hair, crow’s-feet, natural neck wrinkles, facial features, face width, chin projection, neck length, body size, clothing, posture, expression, daylight, and home background. Keep visible pores and age-related texture, leaving plausible natural shadow and folds that are not the targeted secondary fold. Do not rejuvenate, smooth, or reshape her face.
Show the prompt used to create the fictional original
Create a realistic fictional older adult woman in her seventies with short silver hair, gentle crow’s-feet, and naturally occurring neck wrinkles. She wears a forest-green cardigan over a cream blouse and sits near a window with a calm, attentive expression. Clearly show an ordinary secondary under-chin fold alongside authentic age-related skin texture and neck lines. Use soft daylight, modest home surroundings, and a documentary portrait style. Horizontal 4:3 composition.
8. Group photos: identify the person by position and clothing
Use both location and clothing to make the target unambiguous. In this Reddit group-photo request, the requester specifies the woman on the right and wants a natural result; replace “center adult wearing the green shirt” below with an equally clear description of your subject.
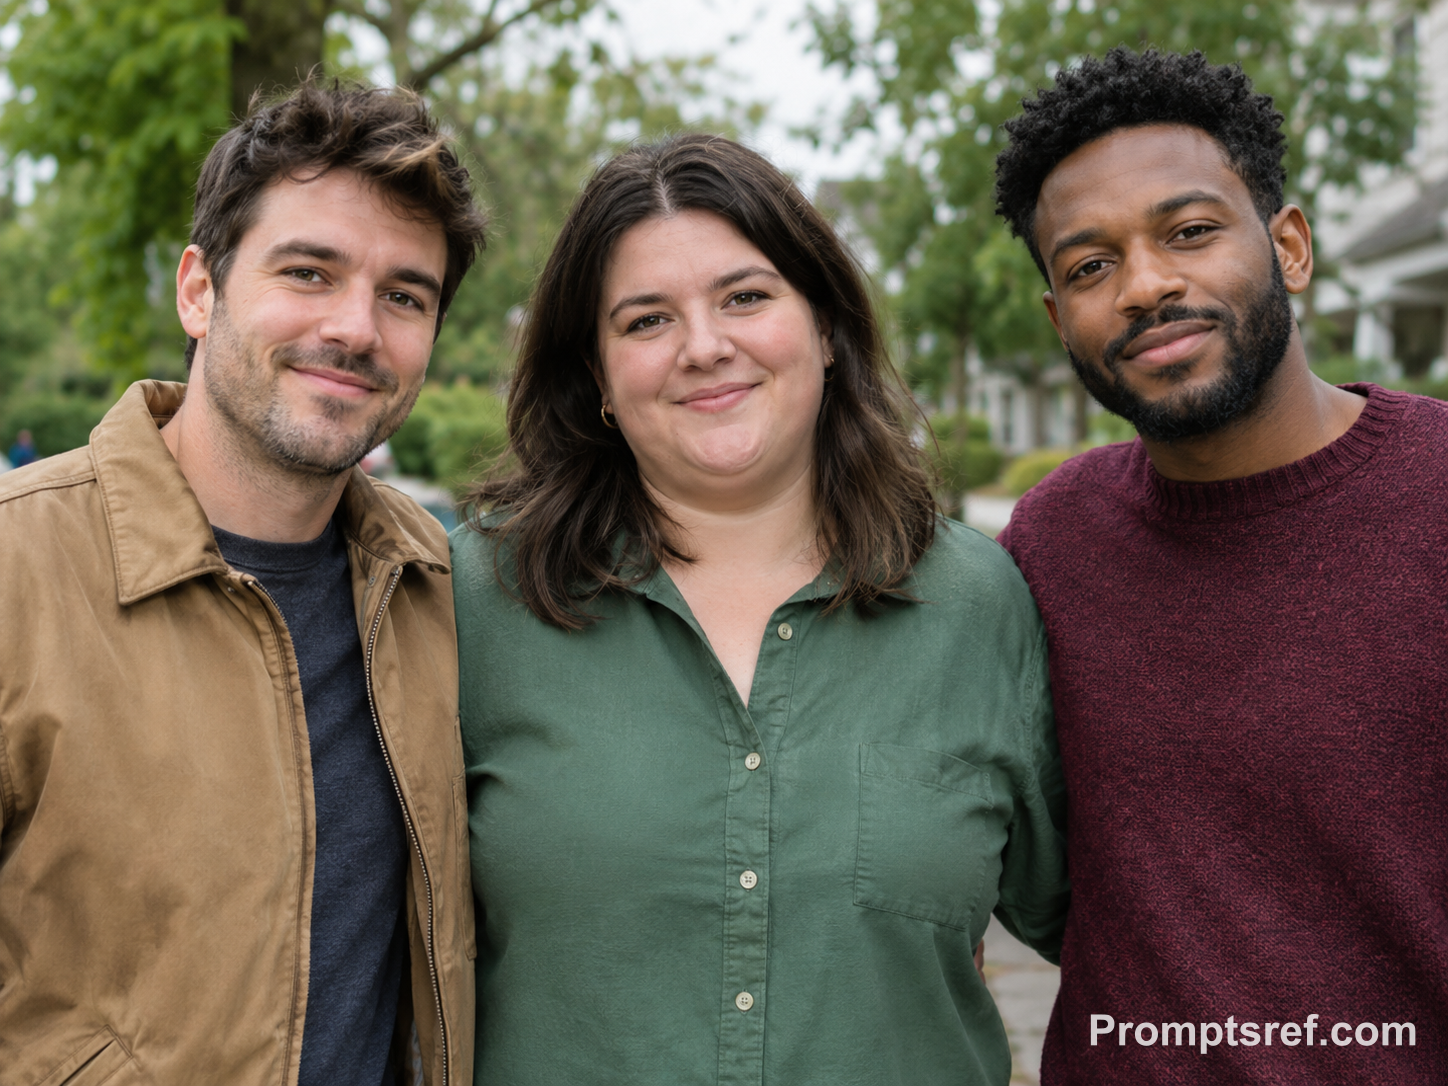
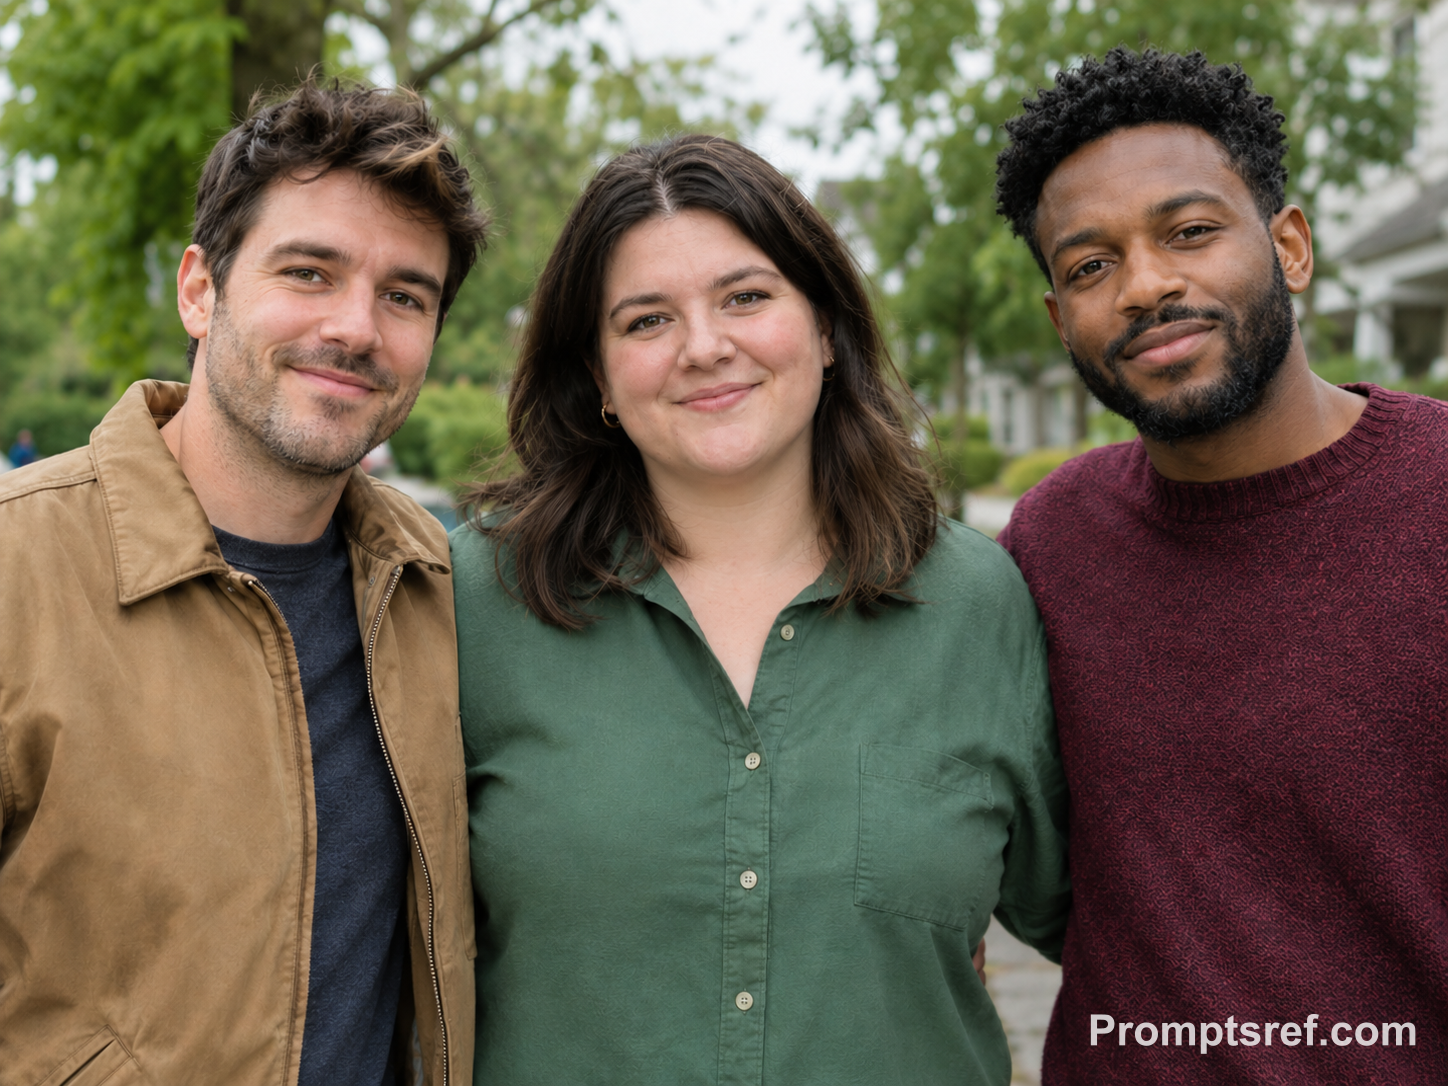
What happened in our test: The center person’s fold is reduced, and both companions keep their recognizable expressions and positions. For your own group photo, inspect every face at 100% zoom—a thumbnail can hide small changes to someone else’s features.
Copy the tested editing prompt:
Using this exact before image, remove only the secondary under-chin fold from the center adult wearing the green shirt. Edit no other person or feature. Preserve all three identities, faces, body sizes, ages, clothing, hairstyles, expressions, poses, spacing, lighting, shadows, camera perspective, and leafy background. Keep the center person’s natural skin texture and a plausible modest shadow beneath the chin. Do not slim the center face globally or alter either neighboring adult.
Show the prompt used to create the fictional original
Create a realistic fictional group photograph of three unrelated adult friends standing shoulder to shoulder outdoors in soft overcast light. The left person wears a tan jacket, the center person wears a green shirt, and the right person wears a burgundy sweater. All three have distinct identities and relaxed expressions. Make only the center adult’s ordinary secondary double-chin fold clearly visible, with natural skin texture, balanced spacing, and a leafy neighborhood background. Horizontal 4:3 composition.
9. Dim restaurant photos: keep the shadows that give the face depth
First decide whether you want to change the fold, the shadow, or both. This prompt reduces the fold while keeping the warm overhead lighting; erasing every dark area under the chin can leave the face and neck looking flat.


What happened in our test: The double contour beneath the chin is reduced moderately, while the warm light and darker under-chin shadow remain. There is no need to brighten the whole neck as though it were lit from the front.
Copy the tested editing prompt:
Using this exact before image, remove only the secondary under-chin fold beneath the woman’s chin. Preserve her identity, facial features, face width, chin projection, neck length, age, body size, earrings, hairstyle, black blouse, listening pose, expression, warm restaurant lighting, strong overhead shadow, table setting, and background. Keep ordinary skin texture and some believable under-chin shadow. Do not brighten the image, smooth wrinkles, change makeup, or slim the face globally.
Show the prompt used to create the fictional original
Create a realistic fictional adult Latina woman in her late fifties seated at a warmly lit restaurant table during dinner. She wears a simple black blouse and small gold hoop earrings, with shoulder-length wavy hair and a relaxed expression while listening to someone off-camera. A strong but realistic overhead pendant creates a visible under-chin shadow and clearly reveals an ordinary secondary double-chin fold. Include natural skin texture and a softly blurred restaurant interior. Horizontal 4:3 composition.
10. Looking down and laughing: save the moment
Use this when a spontaneous laugh is what makes the photo worth keeping. Preserve the lowered head and expression; if “remove” makes the result look strained, change it to “gently reduce” to leave some natural folding.
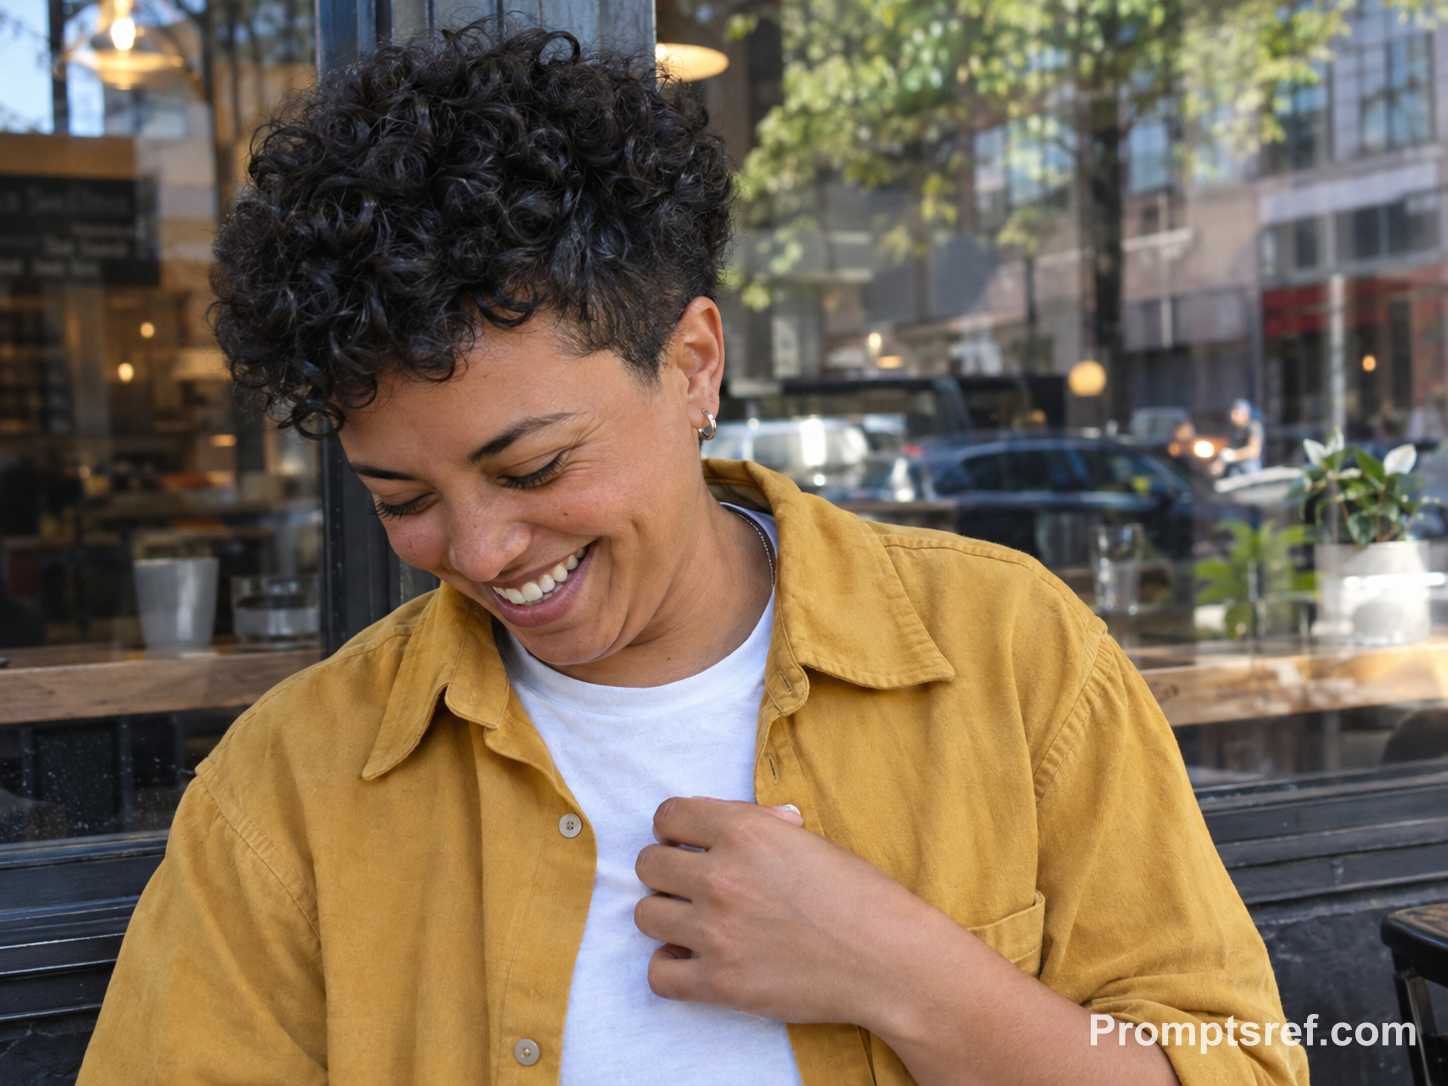
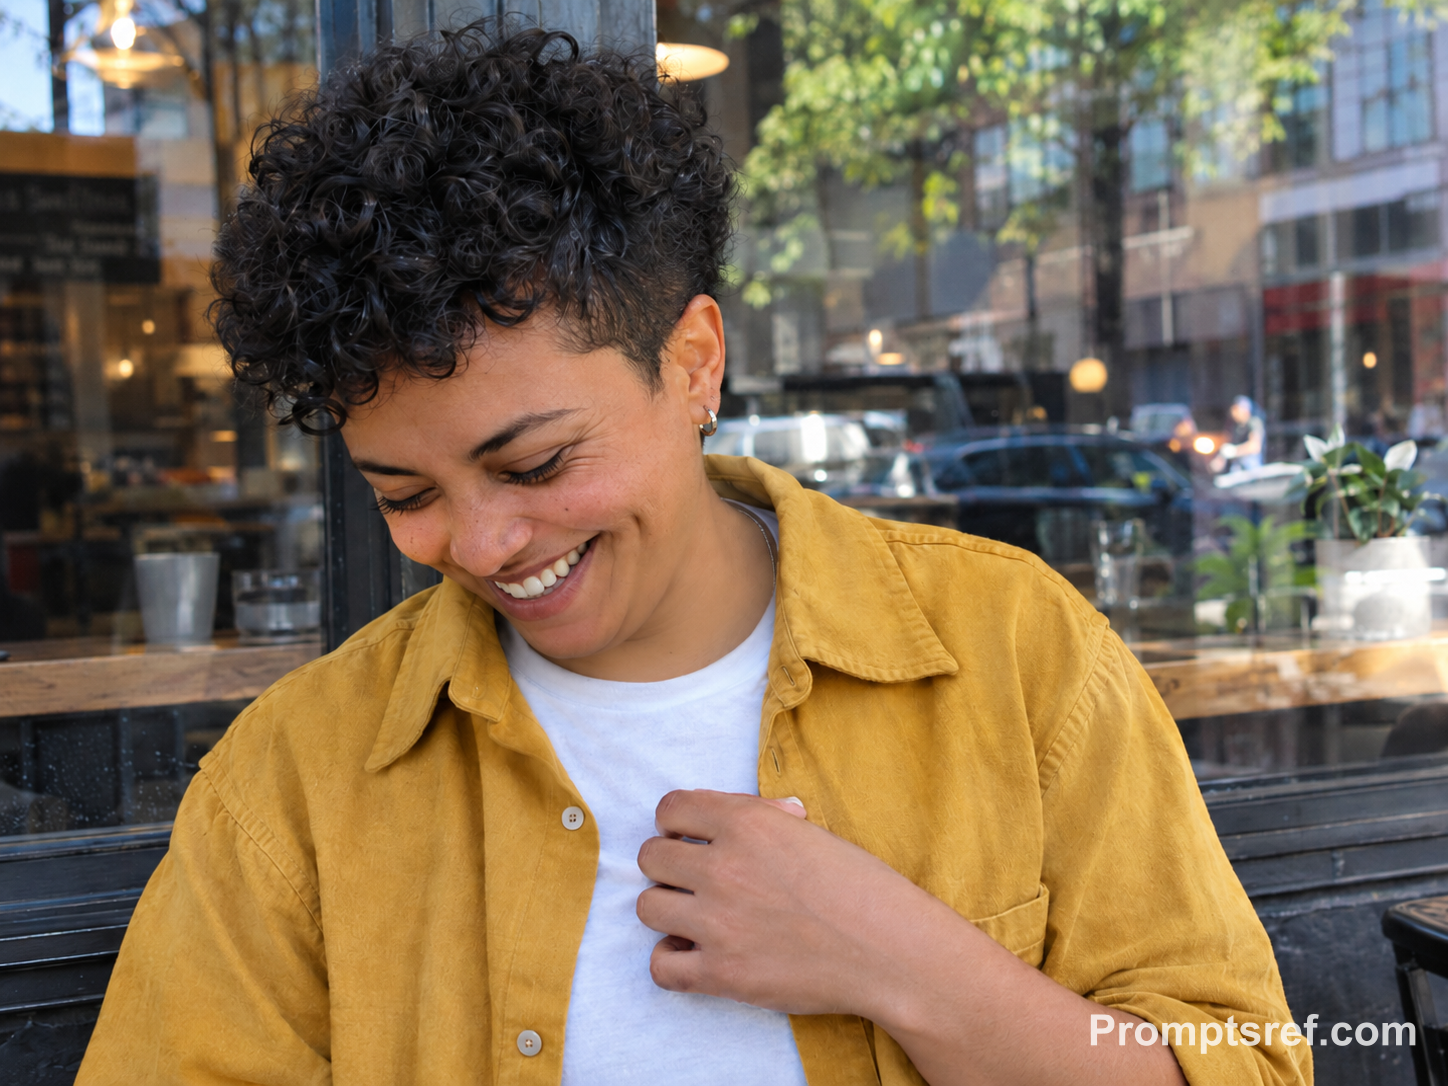
What happened in our test: The lowered head, broad laugh, and hand-at-chest pose remain, with a gentle reduction under the chin. Small skin and clothing details still change, so even a prompt full of preservation instructions needs a final visual check.
Copy the tested editing prompt:
Using this exact before image, remove only the secondary under-chin fold visible while the person looks down and laughs. Preserve their identity, facial features, laugh expression, face width, chin projection, neck length, age, body size, hairstyle, clothing, hand position, pose, natural motion, window reflections, daylight, and café background. Keep laugh lines, pores, and a plausible shadow under the chin. Do not change the expression, smooth the skin, or slim the face globally.
Show the prompt used to create the fictional original
Create a realistic fictional adult nonbinary person in their early thirties, caught candidly looking down and laughing beside a city café window. They have short curly hair, medium-brown skin, a mustard overshirt over a white T-shirt, and one hand near the chest. Their lowered head and genuine laughter make an ordinary secondary double-chin fold clearly visible. Preserve natural laugh lines, skin texture, slight motion energy, daylight reflections, and an authentic casual background. Horizontal 4:3 composition.
Gone too far? Change one instruction at a time
| Problem | What to change |
|---|---|
| The whole face is narrower | Start from the original and add: “Keep the cheek width and both jaw corners in place; edit only the small fold directly under the chin.” |
| The neck is longer | Add: “Keep the chin tip, collar, shoulders, and head in their original positions.” |
| The skin looks heavily airbrushed | Ask to retain pores, fine lines, and neck creases outside the target fold. Remove broad beauty terms such as “flawless skin” and “beauty retouch.” |
| The chin looks pasted on | Ask for a soft transition into the neck and natural shadow matching the original light direction. Do not erase all shadows. |
| The collar, earrings, or beard change | Name the detail to protect. If it keeps changing, use an editor with a local selection or inpainting mask. |
| There is barely any change | Use the original again and request a clearer reduction of the secondary fold. Avoid “slim face,” which expands the edit. |
| Someone else in the group changes | Identify the target by position and clothing color, and specify that everyone else stays unchanged. Discard the result if they still change. |
If text-based editing keeps altering nearby clothing or accessories, switch to a more controlled local workflow. Photoshop’s Liquify Freeze Mask can protect an area from distortion; freeze a close-fitting collar before adjusting the chin contour, following Adobe’s Freeze Mask instructions.
Questions about removing a double chin in photos
Can AI remove a double chin without changing my features at all?
It can reduce the visible fold, but “preserve everything else” is a generative instruction, not a pixel lock. Upload a clear original, keep the edit narrowly defined, and reject results that alter the eyes, mouth, or face shape.
Which app or tool should I use?
You need a tool that accepts both a reference photo and a written editing instruction. The image-to-image generator supports that workflow; for tighter control around a collar or a neighboring face, an editor with local masks or manual Liquify adjustments can help contain the change.
Text-to-image generation is useful for making fictional test subjects. To retouch your own photo, supply that photo as the reference first.
How do I remove a double chin on an iPhone?
Open an AI editor that accepts reference images in your browser, select the original from Photos, and paste the relevant prompt. Save the result as a new photo so you can compare the two.
Avoid treating the chin as something to erase with Photos’ Clean Up tool. Apple’s editing guidance describes removing distracting objects and notes that brushing over a face can pixelate it.
Is this free?
All the prompts here are free to copy, while generating images can use credits. In our test, the Promptsref Prompt Generator cost 2 credits per response and one GPT Image 2.5 Sunburst image at 1K cost 9 credits; check the displayed total for your model before generating.
Can I keep my neck lines, beard, and smile?
Ask for each explicitly, then inspect the result. Ordinary neck lines are not necessarily the fold you want reduced, so “reduce the secondary fold directly beneath the chin” is more precise than “smooth the neck.”
Zoom in to check that beard hairs have not blurred into a patch, and compare the mouth corners and cheek creases in a smiling portrait. A tidier chin is not worth losing the expression you liked.
Why is a double chin more noticeable in some photos?
Head position, camera height, and overhead light affect the visible folds and shadows. The same person can look quite different when looking down versus facing the camera, so adjusting the next shot may be easier than retouching it later.
Try holding the camera just above eye level, relaxing your shoulders, and bringing your chin very slightly toward the lens without stretching your neck. Take a couple of shots and compare what suits your face.
Should I add a negative prompt or just write “no double chin”?
“No double chin” alone does not identify the person or the features to preserve, leaving too much room for a broader redraw. In an editor that understands natural-language instructions, put the specific adjustment and preservation requirements in the main prompt; use a separate negative-prompt field only if the tool provides one.