

Remove Acne from Photos with AI: 10 Best Prompts, Before & After

Founder of Promptsref
Founder of Promptsref and AI UGC creator focused on practical generative AI workflows, prompt engineering, and creator education, with an audience of more than 40,000 across social platforms.
In this article
One red pimple on your chin calls for a small correction. Ask AI to “beautify my skin,” though, and it may also blur your pores, lighten your complexion and erase freckles you wanted to keep.
Start by defining the edit: upload the original, identify the spots to remove and name the details to preserve. These ten prompts cover different portrait situations, with an original and an actual edited result for each.
How to remove acne with AI and keep natural skin texture
Start with your photo, not a new face
Open the Promptsref image-to-image generator, upload your portrait under Reference Images, choose a model that accepts references and keep the original aspect ratio. A reference helps preserve recognizable features; it does not guarantee an unchanged face or unchanged surrounding pixels.
For your own photo, upload the original and copy the editing prompt for the closest scenario. Adjust the blemish location and the details you want to preserve to match your image.
- Use a clear original. Choose the camera file over a compressed chat screenshot or a photo already smoothed by a filter. You should be able to see each spot’s edges when you zoom in.
- Ask for one change at a time. “Remove the red pimples on the upper forehead” is easier to check than “improve my skin.”
- Name nearby details to keep. Fine hair, freckles, stubble, glasses and lip makeup need particular attention when they sit beside a spot.
- Compare at 100%. Check overall lighting and color, then local texture. Keep the original for another attempt.
Give the prompt four pieces of information
Use location + requested change + skin details to retain + surrounding details to retain. For example: remove the red pimple in the center of the chin; keep pores, fine facial hair, the jaw’s shadow, lip color and lighting.
If a spot sits next to a mole or beard hair, describe their positions to the AI Prompt Generator and ask it to write the edit instruction. Before copying it, check that it has not added skin lightening or face reshaping.
A prompt guides the edit but cannot lock the surrounding pixels. In a Reddit photography discussion, a customer reported lost freckles, a partly missing necklace and a changed beard after AI retouching—a reason to inspect more than the skin.
10 best AI acne-removal prompts, matched to your photo
These prompts were generated through Promptsref’s AI Prompt Generator → Random photography prompts workflow. “Best” means useful starting points for ten situations; the source image and model still affect the result.
All subjects are fictional adults generated with AI. Each after image uses its corresponding before image as a reference, and the tested English prompts are kept verbatim so you can reuse the instructions shown here.
Test settings: September 27, 2026; the model labeled GPT Image 2.5 Sunburst on Promptsref; 1K, 4:3, one original per edit. The images retain the site watermark, and actual file dimensions varied despite the same 1K setting.
1. Daylight selfie: a few spots on the cheek and chin
Use this when you like the expression and lighting and only want a few spots removed. Limit the request to the lower cheek and chin without adding skin brightening or face slimming.
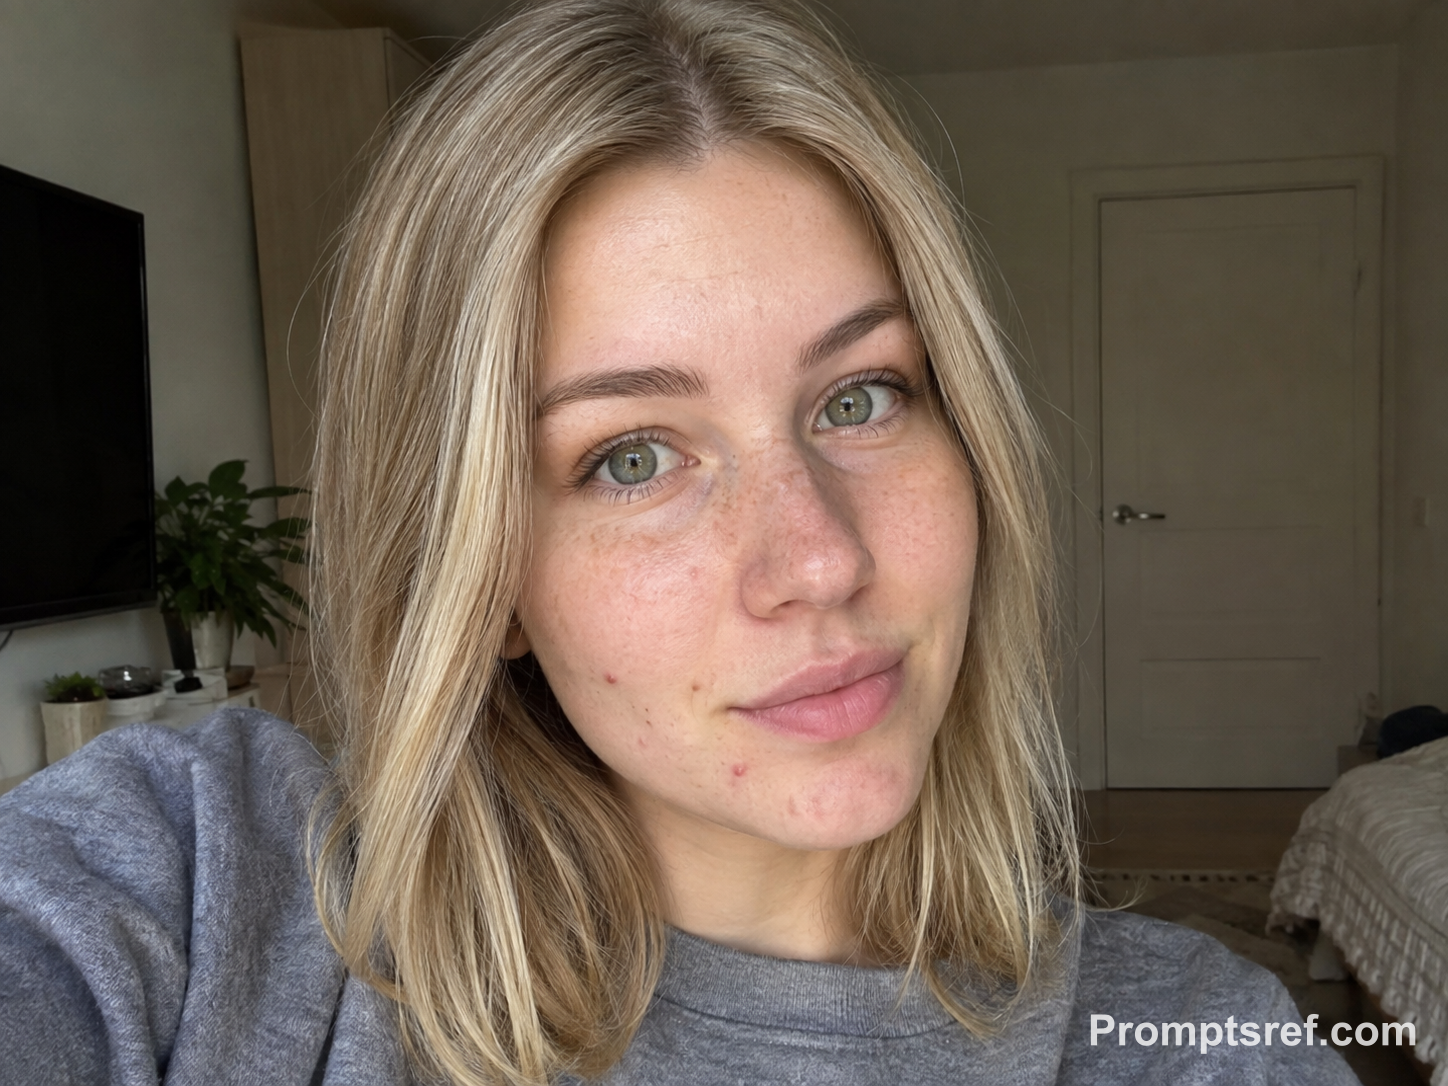
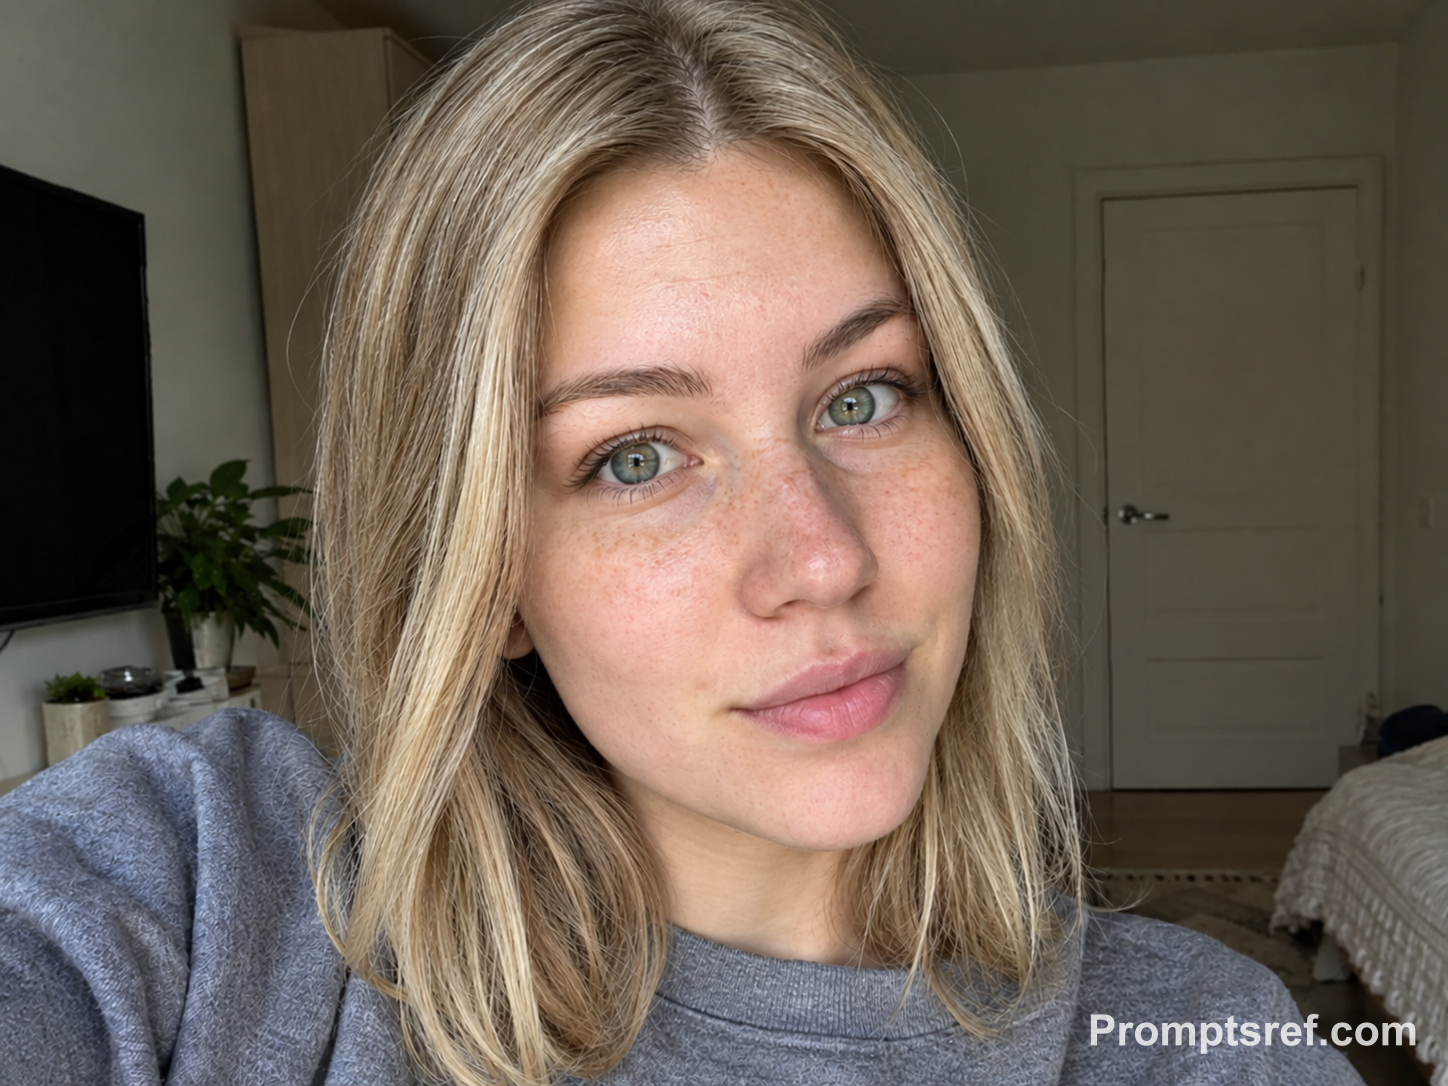
What happened: The cheek and chin pimples are removed, while light freckles and some skin texture remain. The pose, hair and room still match at normal viewing size; open the full-size files to check finer detail.
Editing prompt used:
Edit the exact uploaded portrait to remove only the specified temporary pimples on the lower cheek and chin. Preserve identity, facial features, natural pores, skin tone, lighting, clothing, background, and all accessories. Do not reshape the face, smooth the entire complexion, add makeup, remove permanent marks, or create a beauty-filter effect.
2. Forehead spots: protect the hairline
Pimples near the hairline sit beside fine strands that can disappear in a retouch. Compare the upper forehead edge, particularly where wispy bangs meet skin.
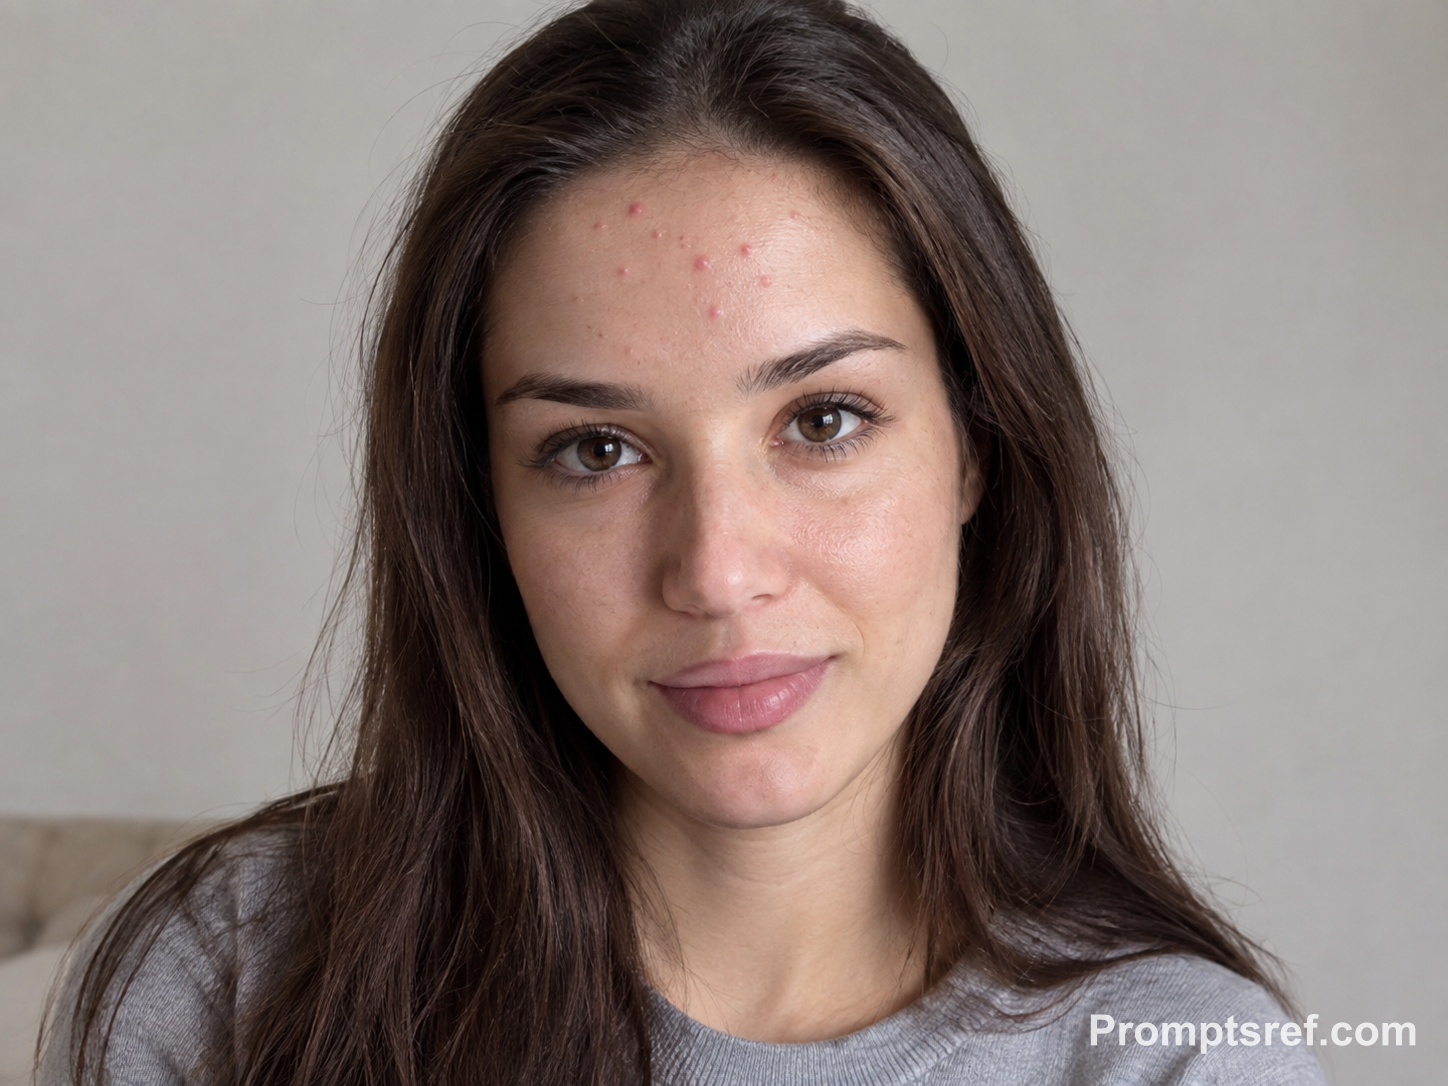
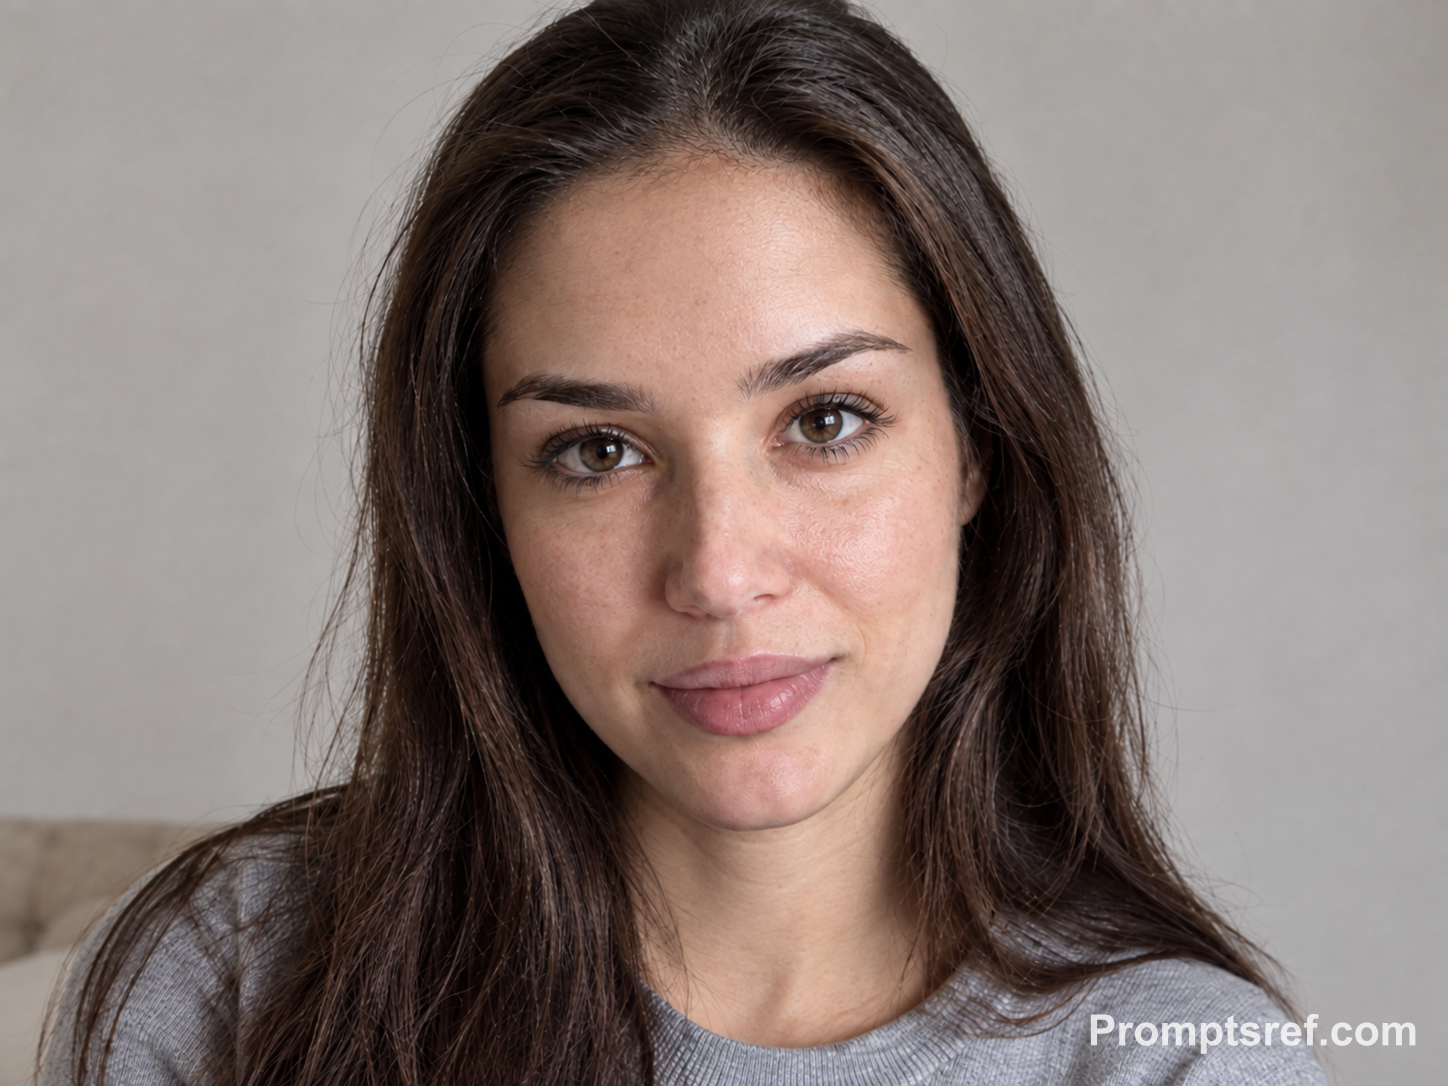
What happened: The forehead spots are gone and the hairline broadly matches. The face also looks slightly darker and sharper, so the edit changed more than the spots.
Editing prompt used:
Edit the exact uploaded portrait to remove only the temporary pimples along the upper forehead near the hairline. Preserve the person’s identity, facial structure, natural pores, skin tone, lighting, hairstyle, clothing, background, and accessories. Do not alter the hairline, reshape the forehead, smooth unaffected skin, add makeup, or remove any unrelated natural marks.
3. Cheek acne: keep the freckles
If the spots are on one side, add “viewer’s left” or “viewer’s right.” Check a few distinctive freckles: their presence alone does not prove that the original pattern survived.
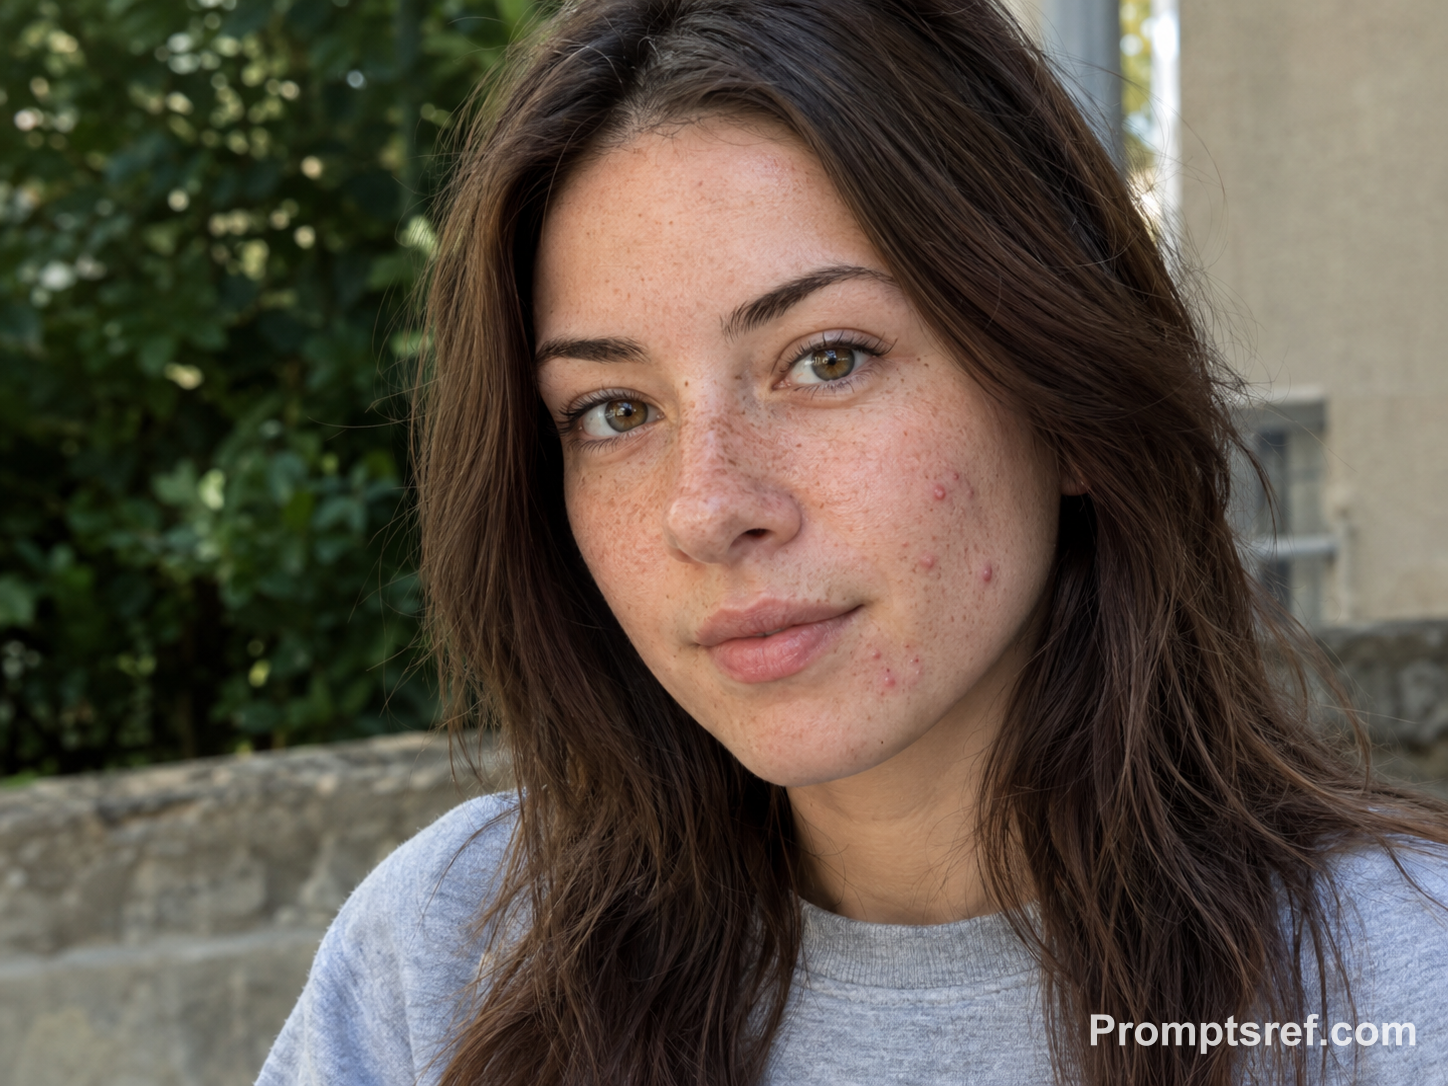
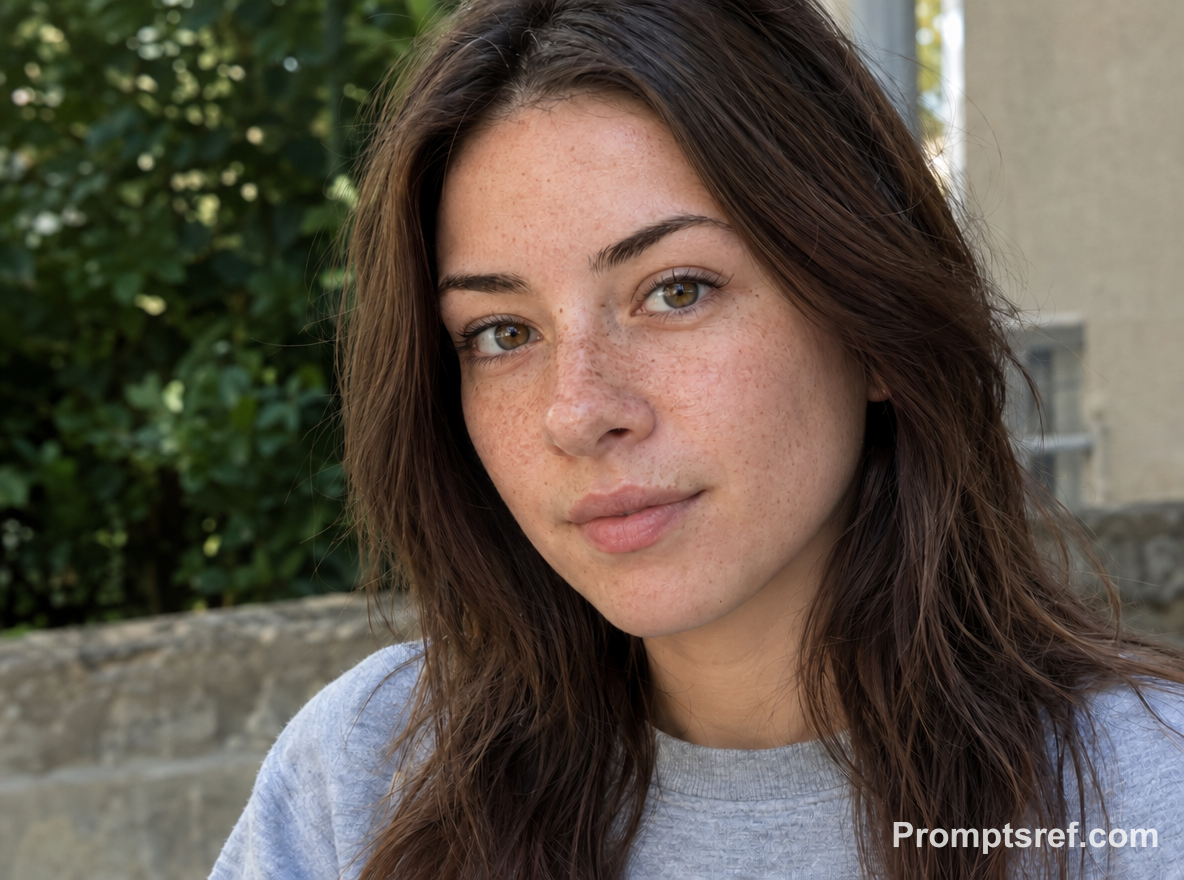
What happened: The prominent cheek pimples are reduced and freckles remain across the nose and cheeks. The edited skin looks more even; compare individual marks if their exact positions matter.
Editing prompt used:
Edit the exact uploaded portrait to remove only the temporary pimples on the specified cheek. Preserve the person’s identity, freckles, natural pores, skin tone, lighting, clothing, background, and accessories. Keep every freckle visible and unchanged. Do not reshape facial features, smooth the whole cheek, add makeup, or erase unrelated texture or marks.
4. Dark skin: retain the complexion and beauty mark
Explicitly ask to keep the original skin tone so spot removal does not become a whole-face brightening pass. Check the mole and compare the cheek with the forehead and neck.
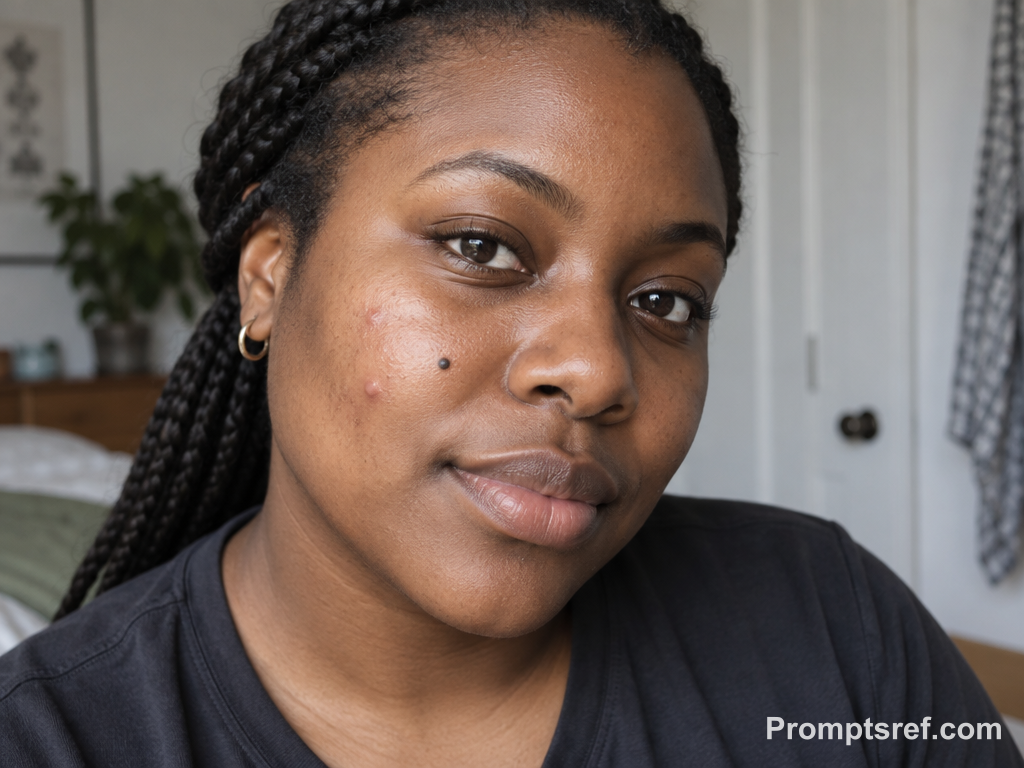
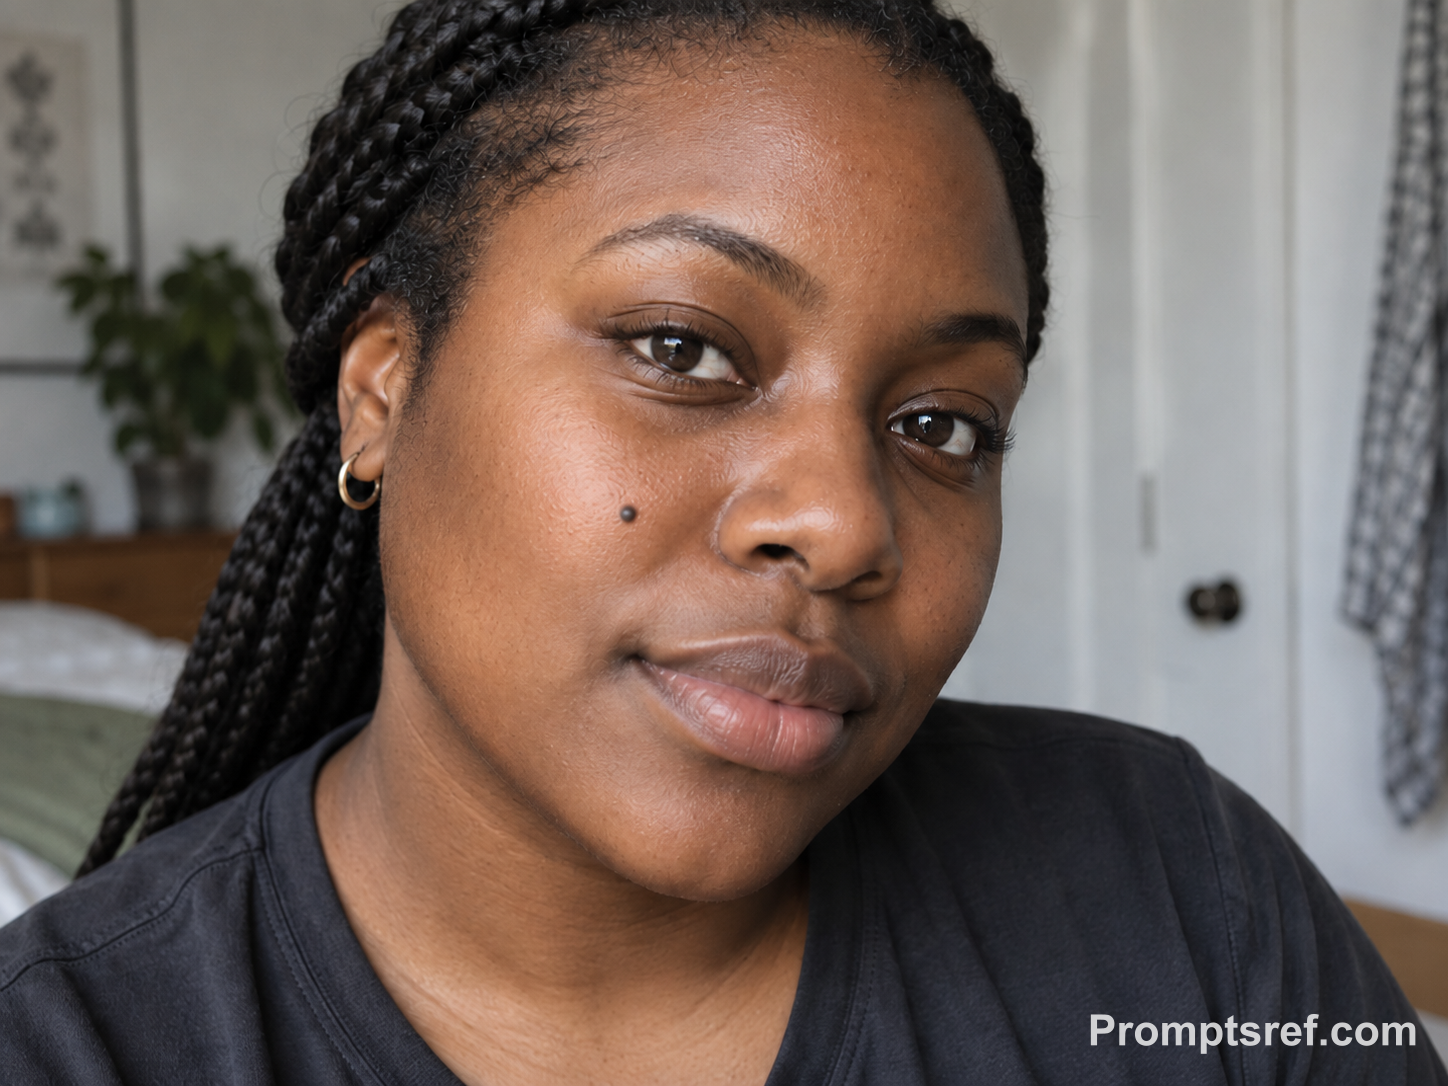
What happened: The pimples beside the mole are removed, while the mole and hoop earring remain. The cheek is smoother with slightly different contrast; use the transition to the neck to judge the result.
Editing prompt used:
Edit the exact uploaded portrait to remove only the temporary pimples on the specified cheek. Preserve identity, the beauty mark, natural pores, deep natural skin tone, lighting, clothing, background, and accessories. Do not lighten the complexion, reshape the face, smooth unaffected skin, add makeup, or remove the beauty mark or any other natural feature.
5. Beard-area acne: keep the stubble
Spots among facial hair call for a small correction. If the repaired patch looks freshly shaved, return to the original and narrow the editing area.
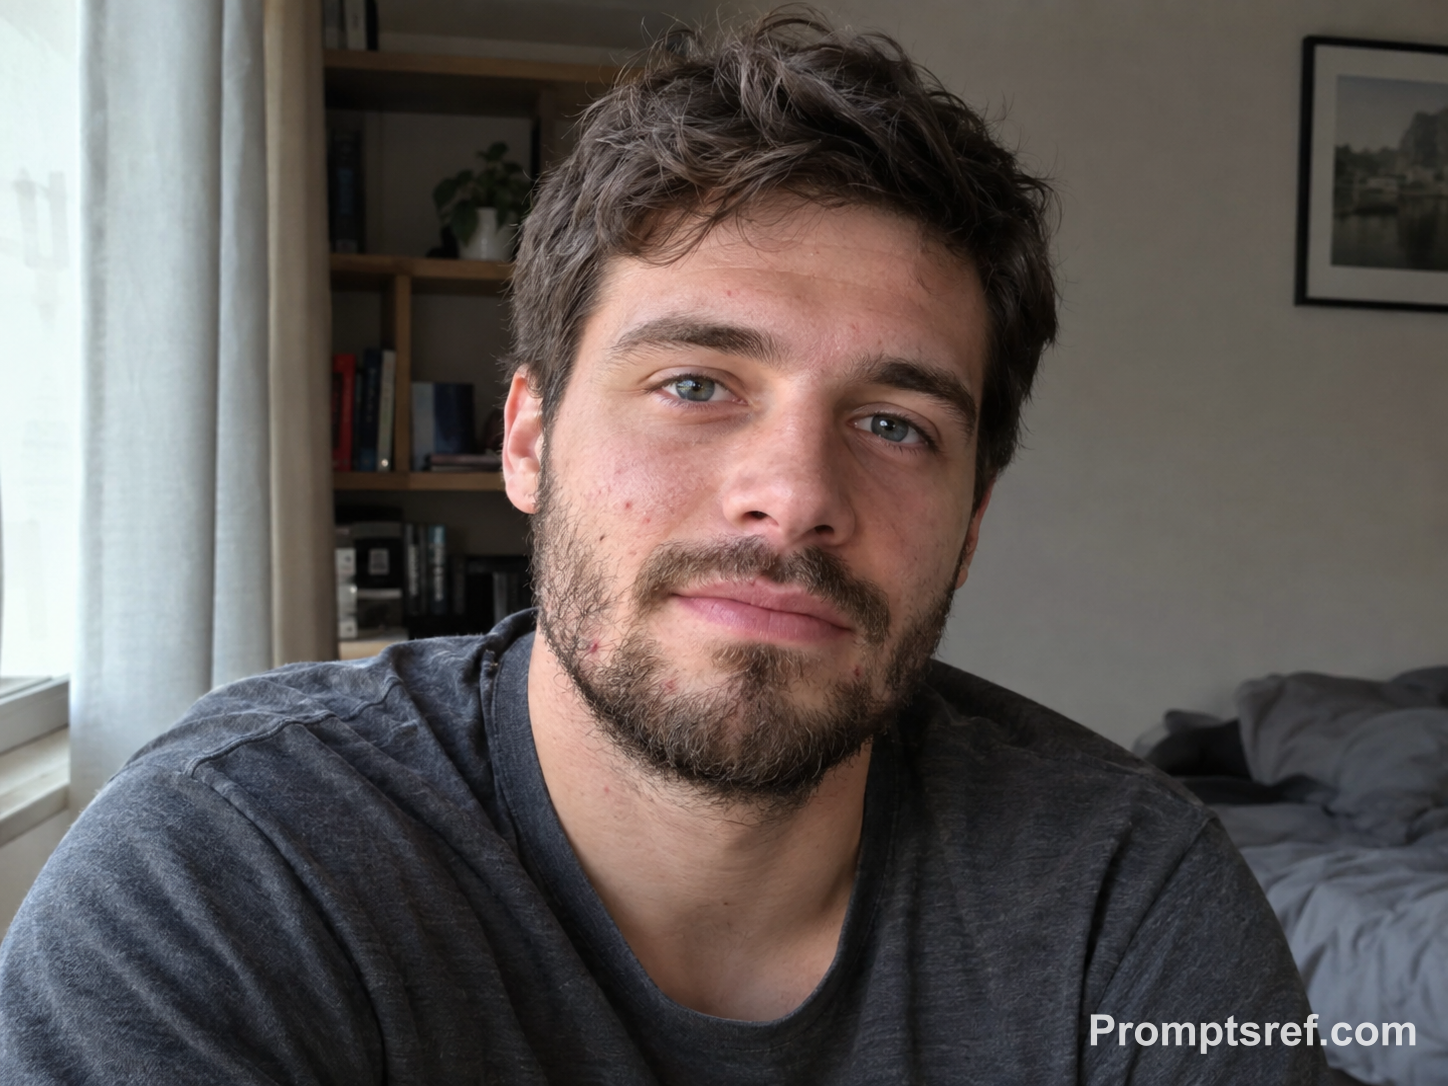
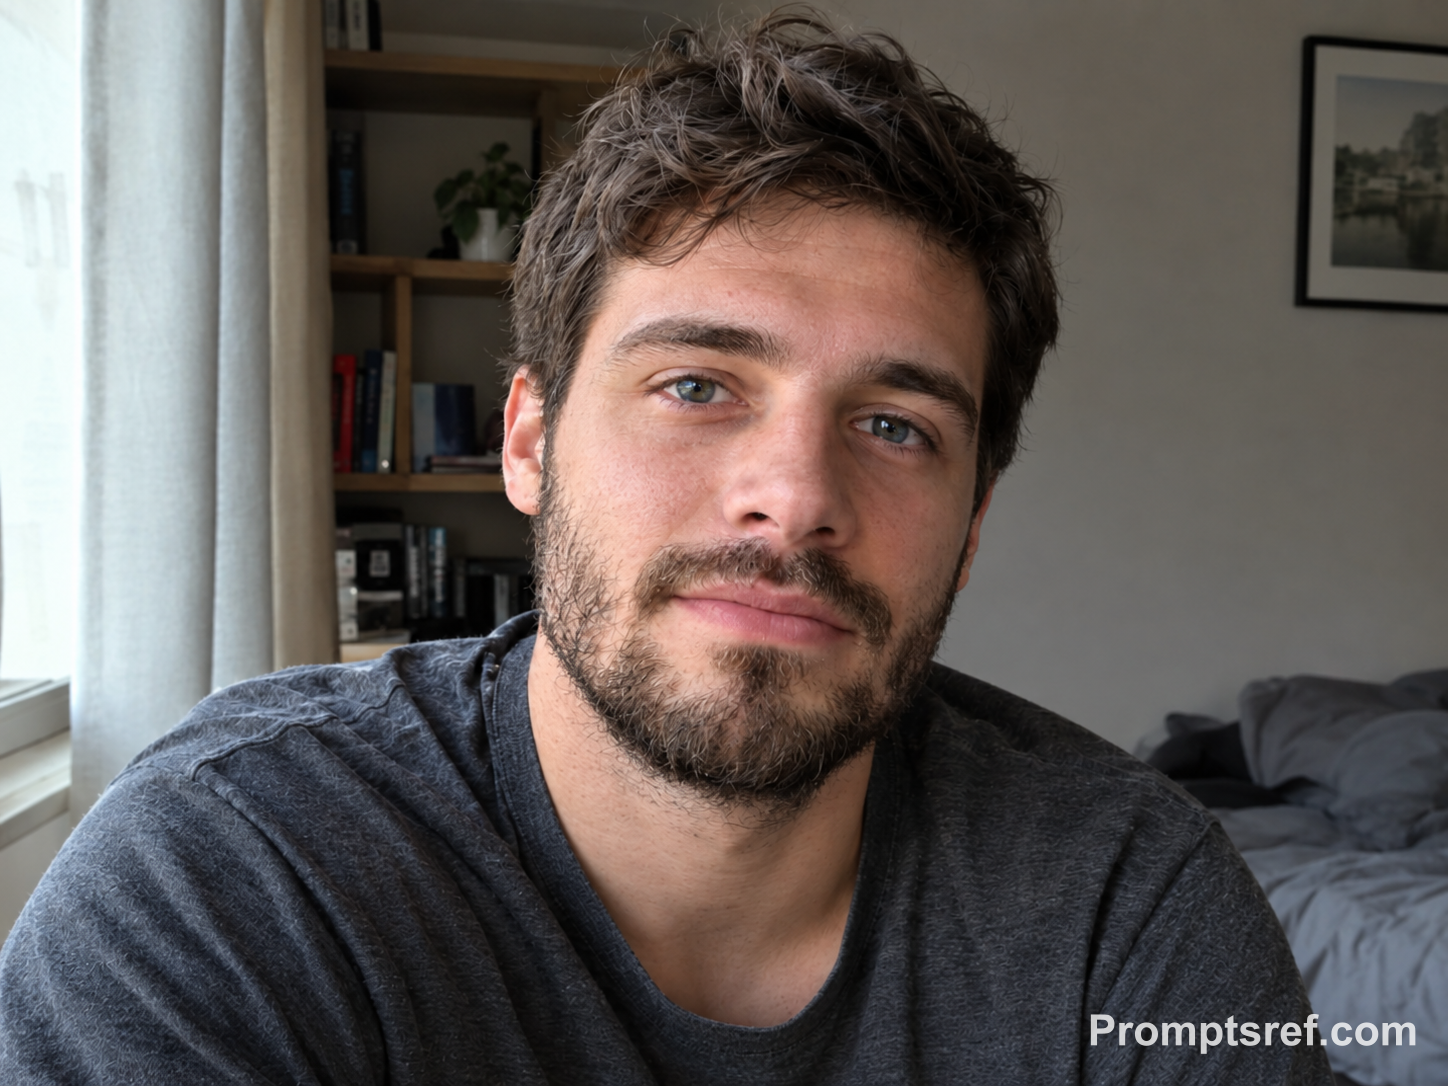
What happened: The conspicuous red spot at the beard edge is reduced without an obvious bare patch. Some redness remains, and the beard looks crisper overall.
Editing prompt used:
Edit the exact uploaded portrait to remove only the specified temporary pimples in the beard and jaw area. Preserve identity, beard growth, natural pores, skin tone, lighting, clothing, background, and accessories. Do not erase or redraw facial hair, reshape the jaw, smooth the entire face, add makeup, or modify unrelated marks and texture.
6. Professional headshot: preserve the glasses and reflections
Spots beside the nose or below the glasses sit close to the frame. Check the nose pads, frame outline and lens reflections as well as the skin.
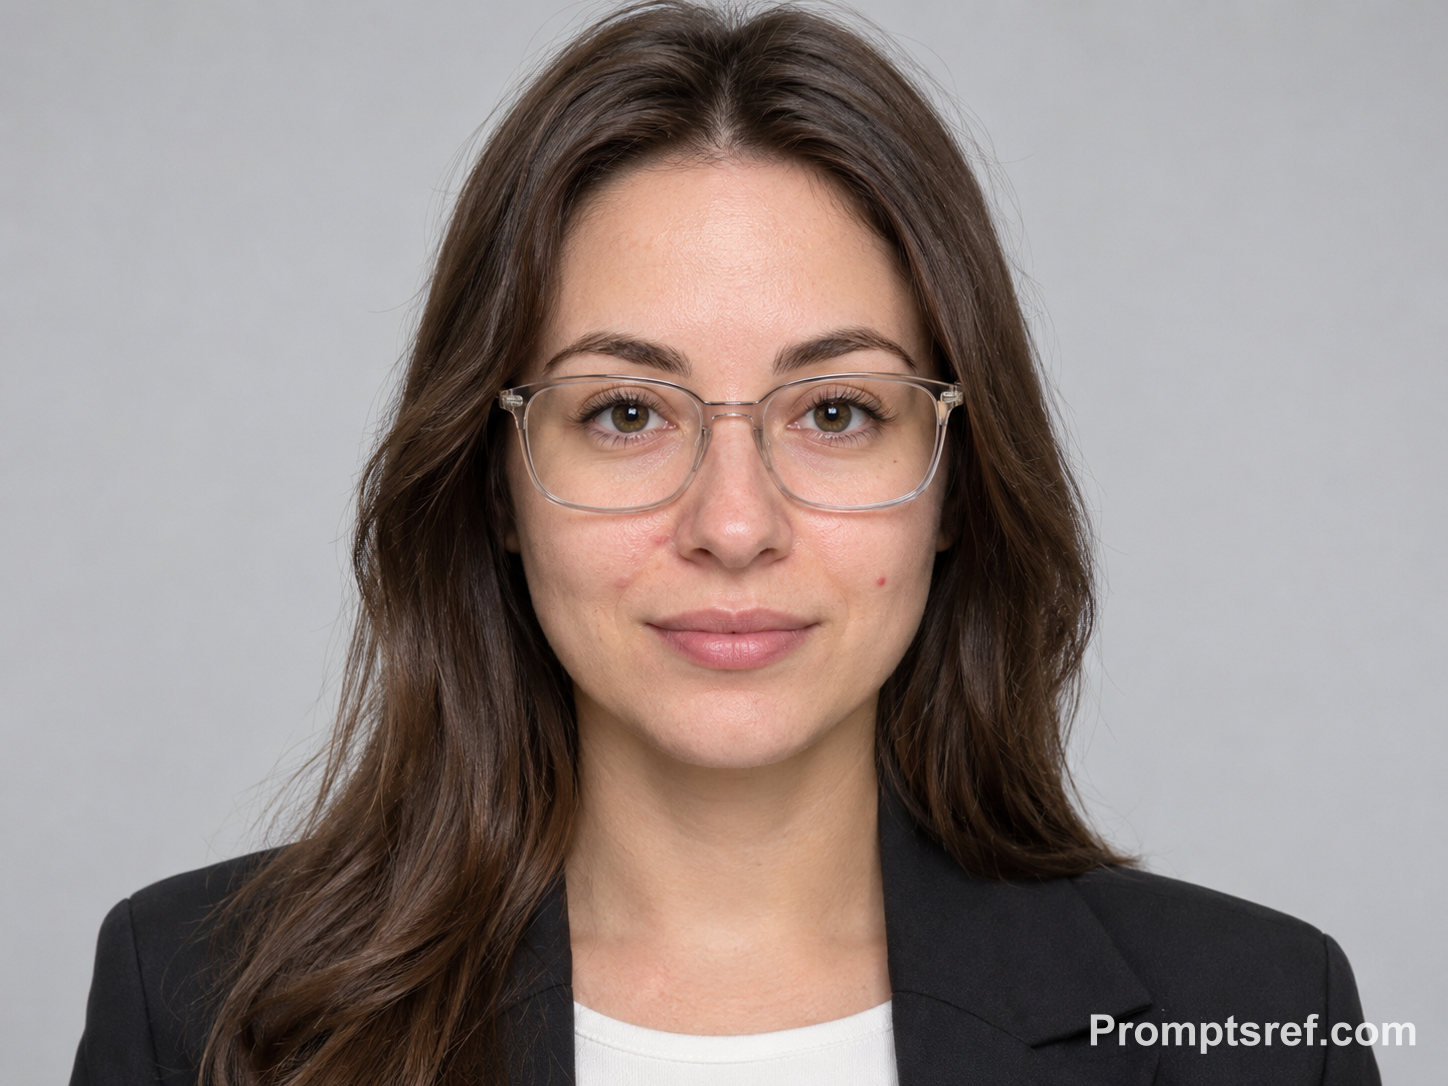

What happened: The cheek spots are removed, and the glasses retain their overall shape and visible reflections. The face looks a little warmer and more defined; intact frames do not mean nothing else changed.
Editing prompt used:
Edit the exact uploaded portrait to remove only the temporary pimples on the cheek and beside the nose. Preserve identity, natural pores, skin tone, lighting, clothing, glasses, background, and all accessories. Do not change the glasses, reshape facial features, smooth the complete complexion, add makeup, brighten the eyes, or create an airbrushed professional headshot.
7. Bridal portrait: keep the existing makeup
The original already has foundation, blush and lip color. Ask to retain those colors and edges, and inspect nearby earrings and veil detail too.
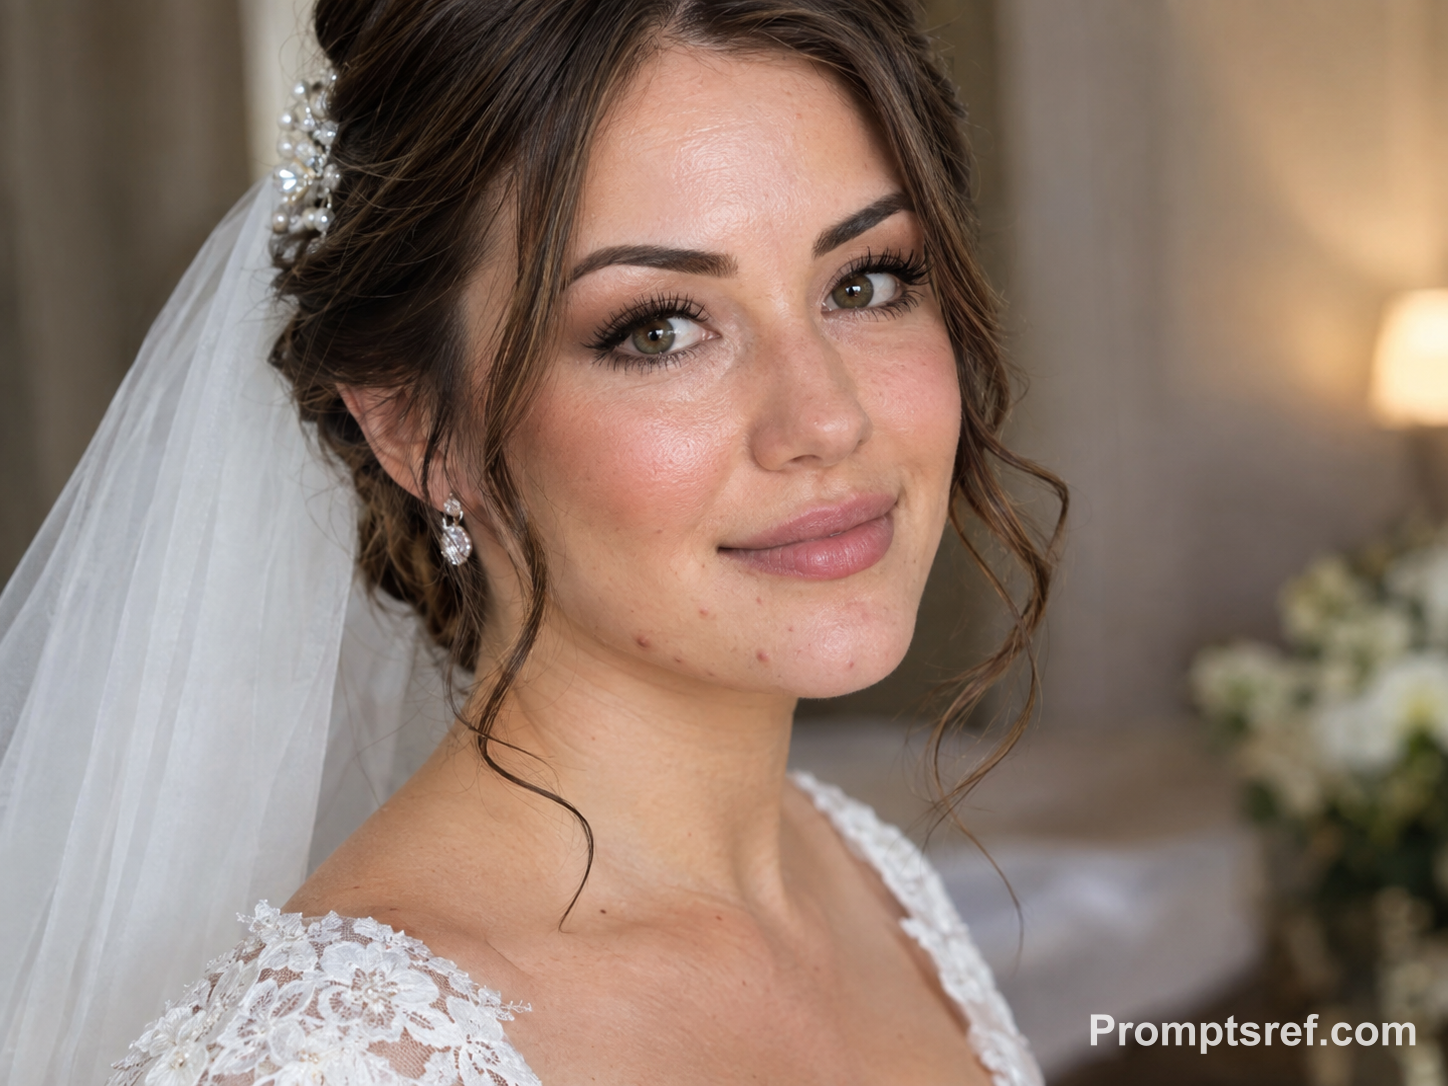
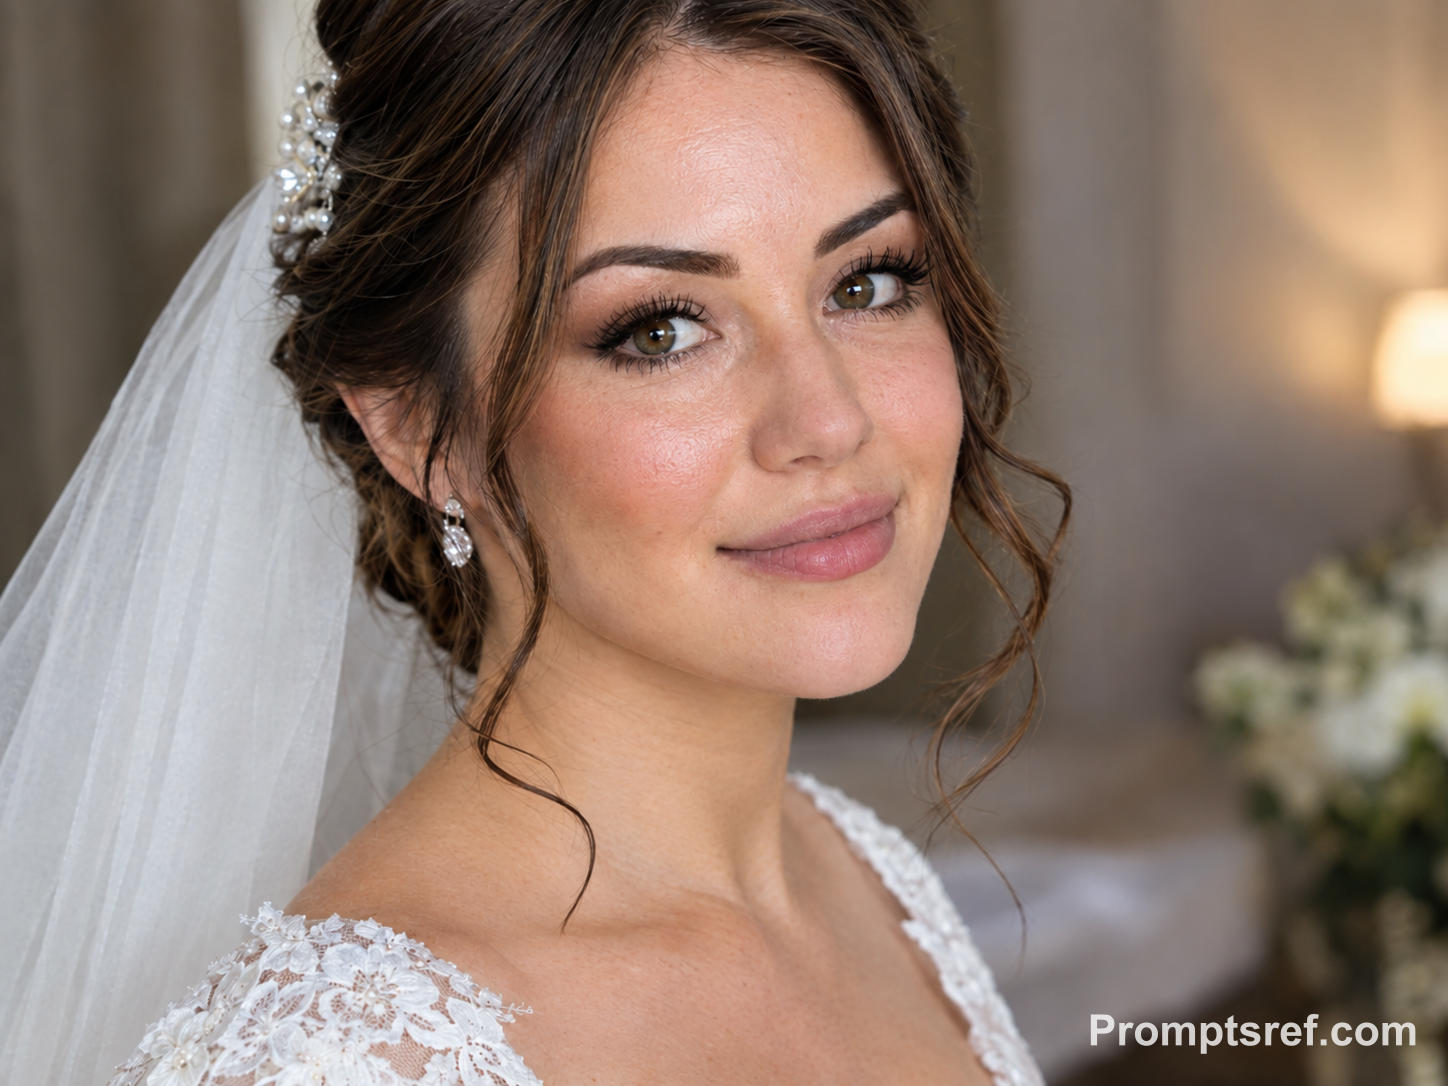
What happened: The jawline and chin spots are reduced, while the blush, lip color, earrings and veil remain recognizable. The skin below the lower lip is more even; decide whether that smoothing suits the existing makeup.
Editing prompt used:
Edit the exact uploaded portrait to remove only the temporary pimples near the jawline. Preserve identity, existing bridal makeup, natural pores, skin tone, lighting, hairstyle, clothing, veil, jewelry, background, and accessories. Do not add makeup, reshape the face, change the makeup style, smooth unaffected skin, erase natural texture, or alter any wedding details.
8. Side-lit cheek: remove pimples, keep flat marks
Separate the two requests: remove raised-looking red pimples and retain flat brown marks. Side light exposes texture changes, so inspect the transition from highlight to shadow.
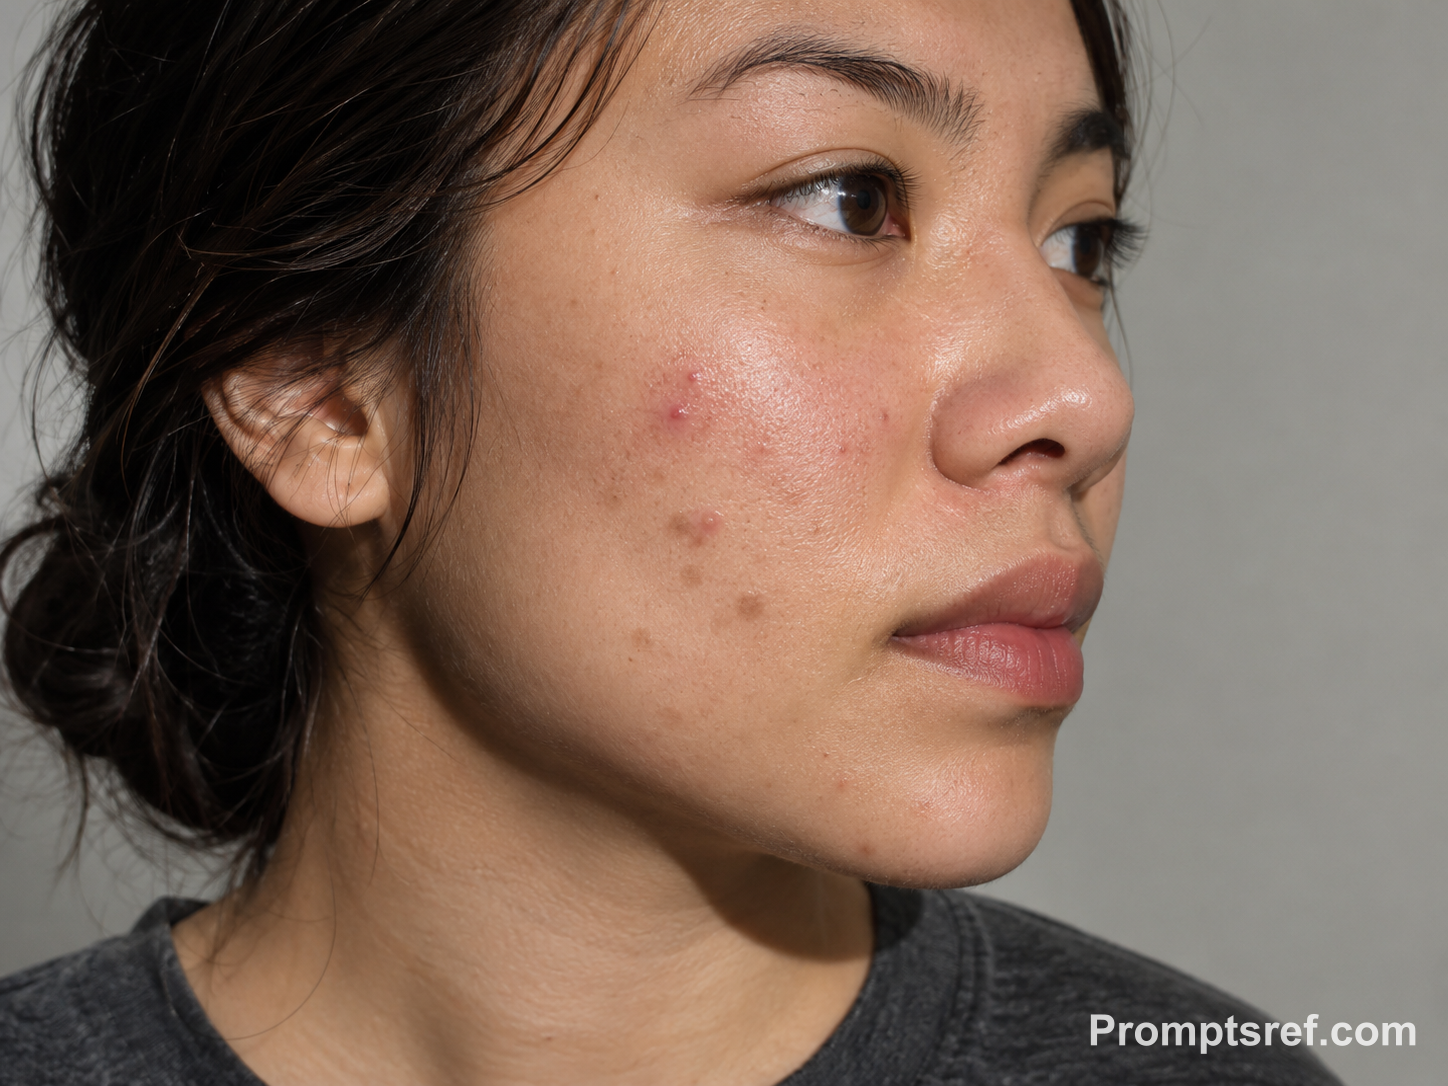
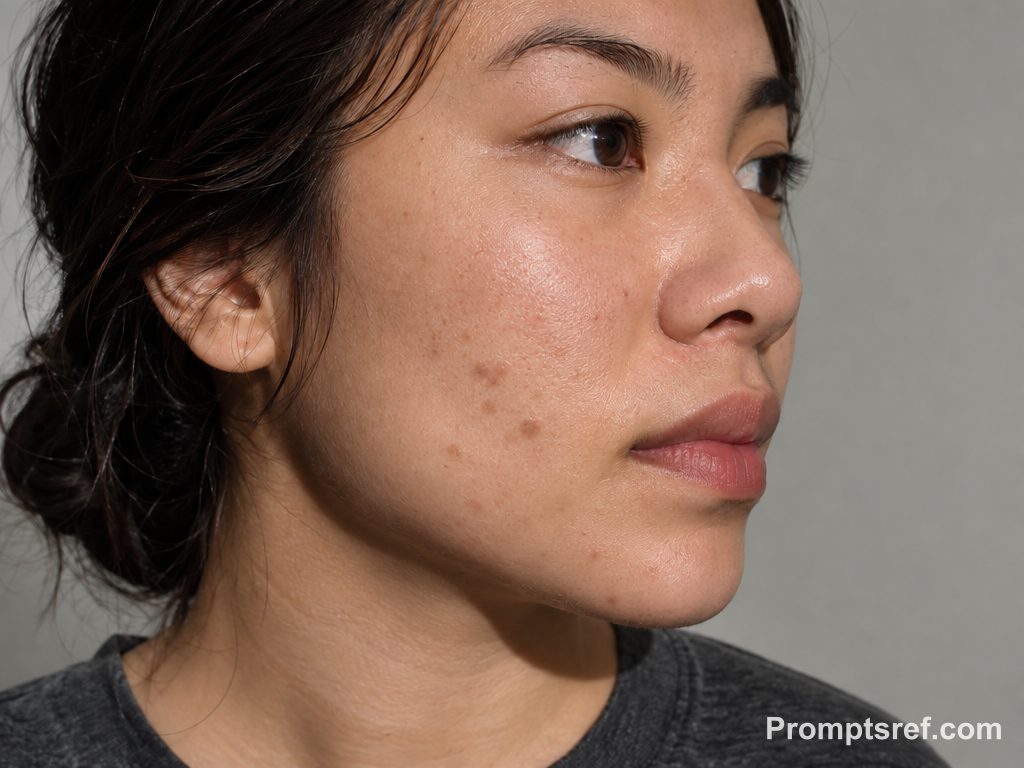
What happened: The raised-looking red spot high on the cheek is removed, while the brown marks below remain visible. Highlights and pores are still apparent; this output followed the distinction fairly well.
Editing prompt used:
Edit the exact uploaded portrait to remove only the specified temporary pimples on the side-lit cheek. Preserve identity, flat post-acne marks, natural pores, skin tone, lighting, clothing, background, and accessories. Do not claim or imply scar treatment, remove flat marks, reshape the face, add makeup, or smooth the entire cheek. Keep the original side-lighting intact.
9. Two-person photo: edit only the person in blue
Identify the target by both position and clothing color. Zoom in on the companion too, looking for unwanted smoothing or facial changes.
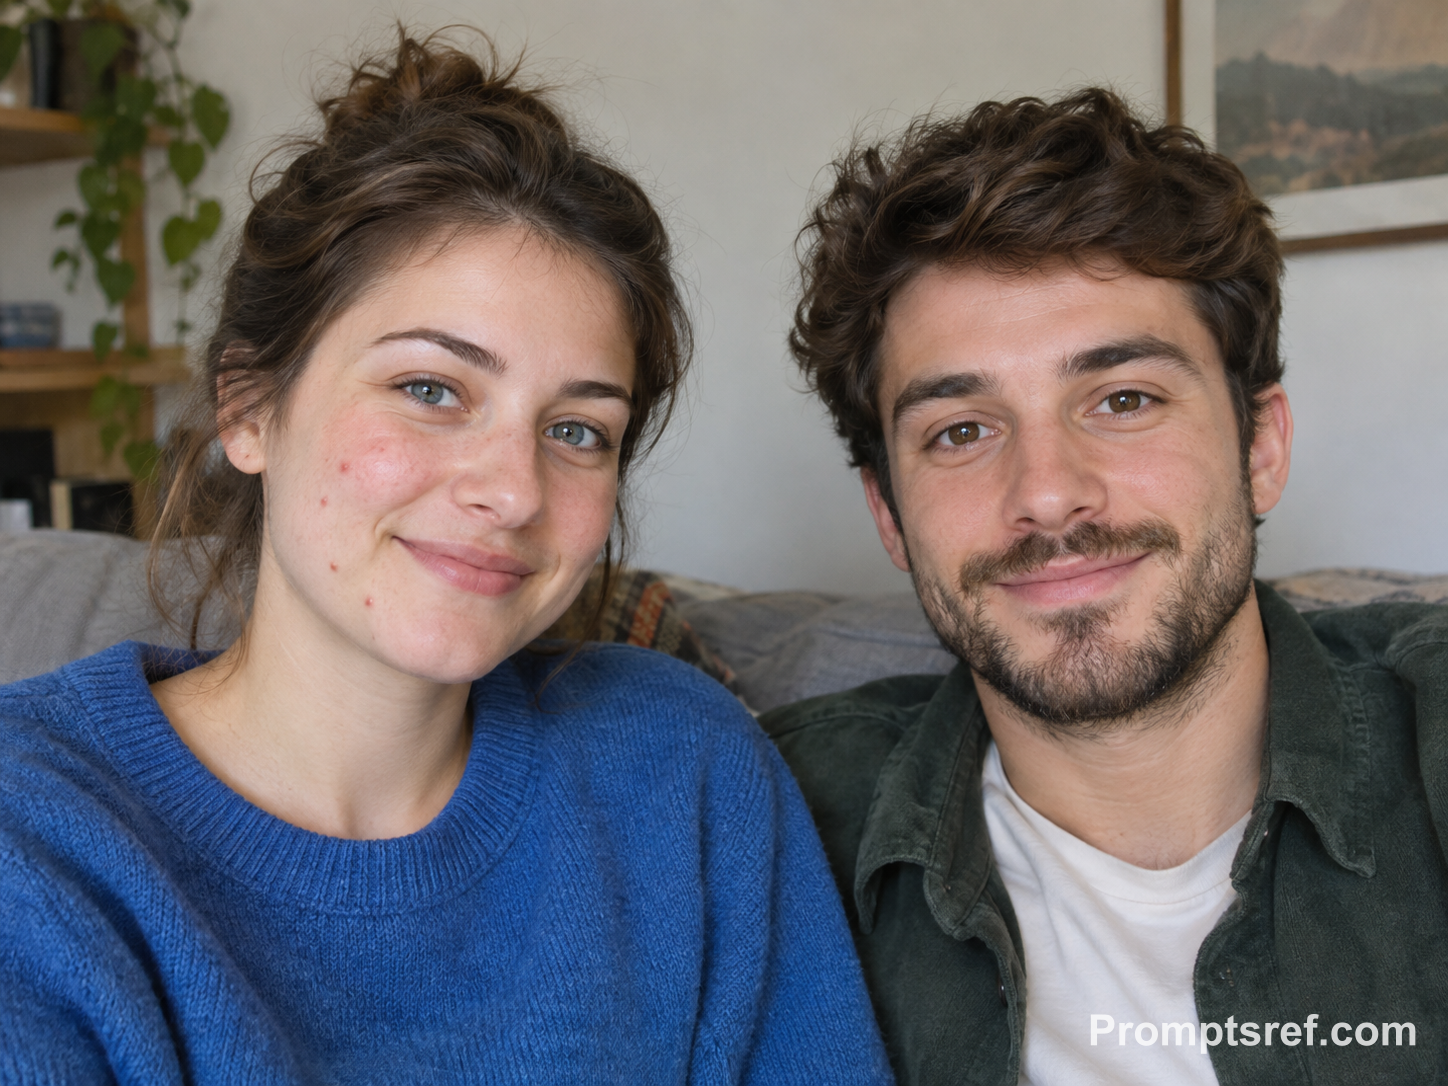

What happened: Spots on the viewer-left person in blue are reduced, and the companion retains his expression and beard. Both faces look slightly sharper, so “do not edit the other person” did not mean pixel-for-pixel preservation.
Editing prompt used:
Edit the exact uploaded portrait to remove only the specified temporary pimples from the viewer-left person wearing blue. Preserve both adults’ identities, natural pores, skin tones, lighting, clothing, background, and accessories. Do not edit the other person, reshape either face, smooth unaffected skin, add makeup, or alter the blue clothing or any group composition detail.
10. Evening portrait: keep the lighting and shadows
Choose an original where the face is readable in the dark, and ask to retain its color temperature and shadows. If you also want noise reduction, do it separately so you can tell which step removes texture.
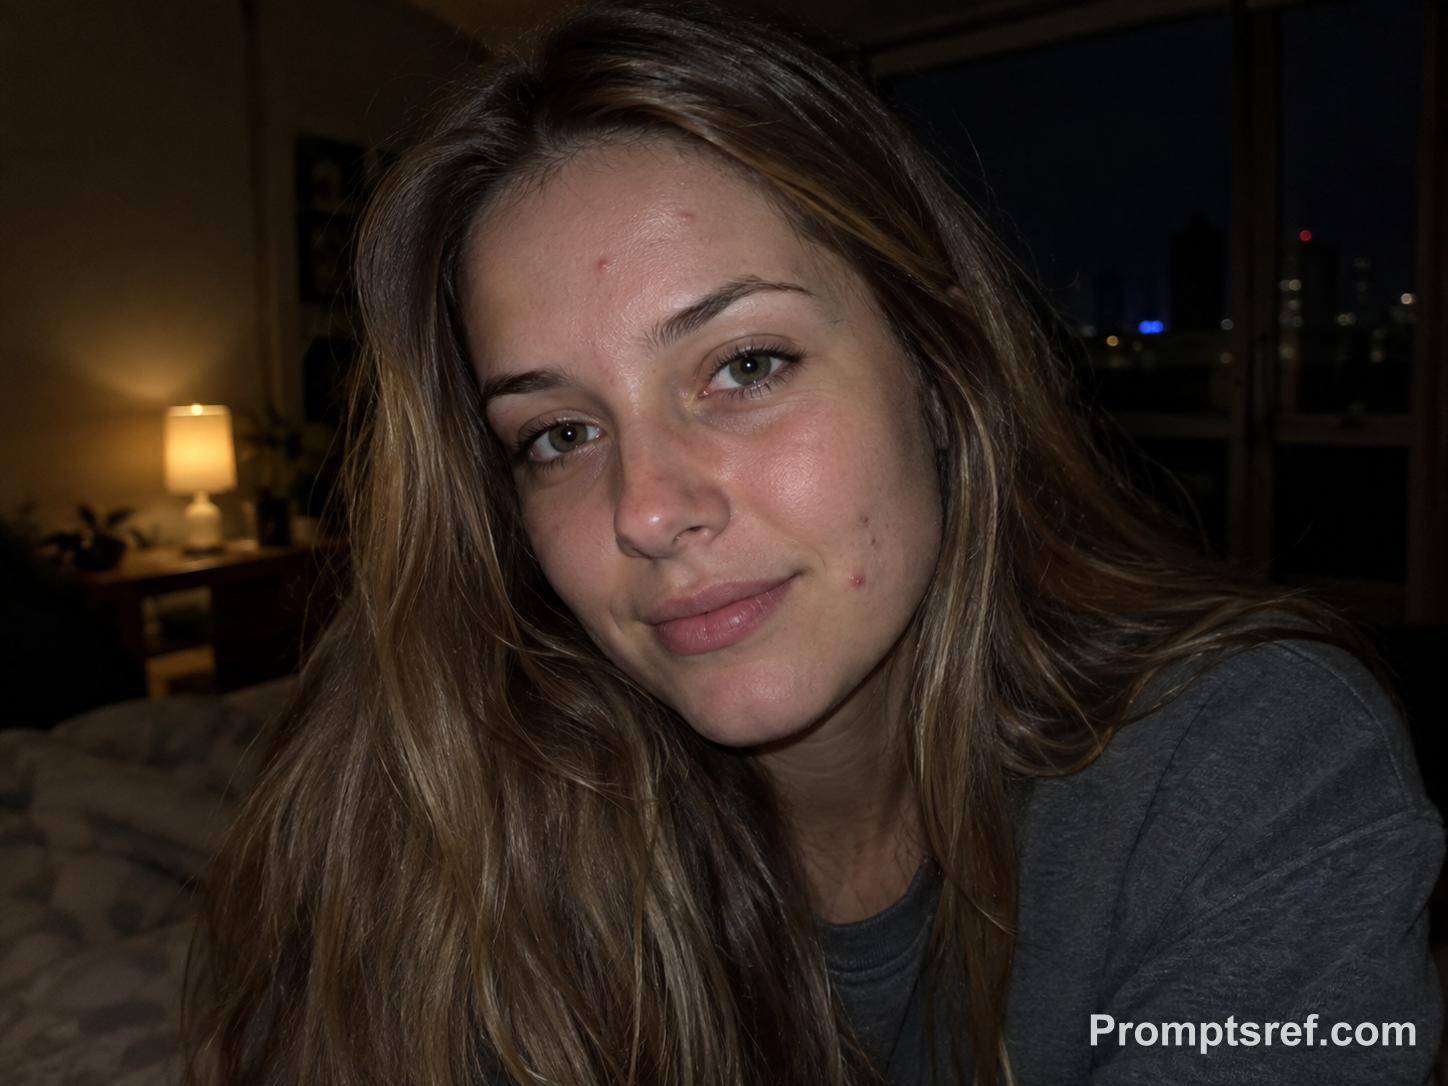
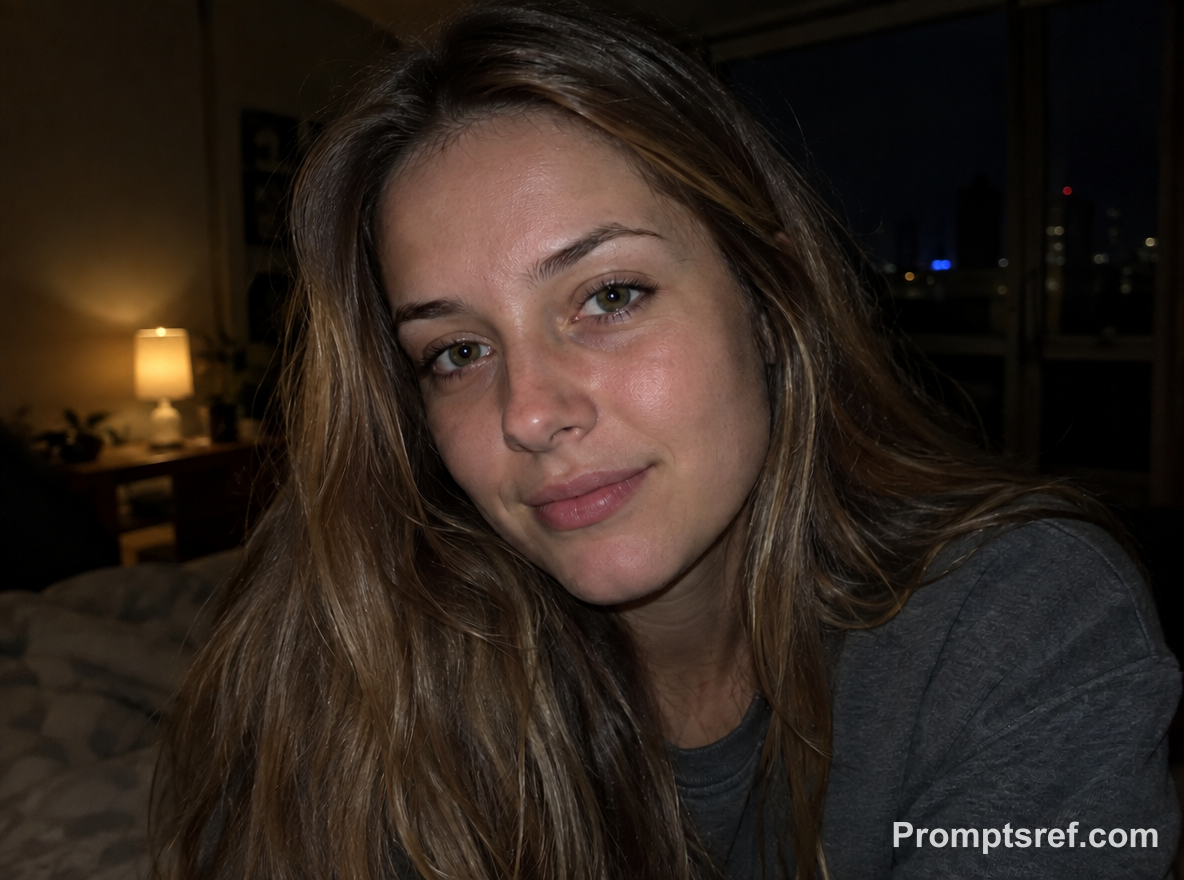
What happened: The forehead and cheek spots are reduced, while the dark room and warm lamp remain. There is no obvious overall brightness lift, but shadow texture still deserves a full-size check.
Editing prompt used:
Edit the exact uploaded portrait to remove only the specified temporary pimples on the forehead and cheek. Preserve identity, natural pores, skin tone, low-light lighting, clothing, background, and accessories. Do not brighten the image excessively, reshape facial features, smooth the entire complexion, add makeup, remove natural marks, or replace the authentic evening atmosphere.
When the retouch is too obvious
| What changed | What to try next |
|---|---|
| Pores disappear across the face | Return to the original, remove broad requests such as “flawless skin,” and name only the spots to edit. |
| Freckles, a mole or stubble vanish | Specify the feature’s location; if it still disappears, use a small healing brush on the pimple. |
| Skin becomes lighter or shadows flatten | Request the original complexion, highlights and shadows, then compare cheek and neck. |
| Glasses, jewelry or the companion’s face change | Discard the output. Use a local selection or mask and check the area outside it. |
For one or two isolated spots, a healing brush may be easier. Adobe’s Spot Healing Brush guide explains how to repair a small area using surrounding pixels; a blank layer with Sample All Layers makes the correction easier to undo or adjust.
Questions to ask before editing
Can AI remove pimples without changing my features?
It can look natural, but a prompt cannot guarantee that pixels outside the spots stay unchanged. Before saving, compare the eyes, nose, lip line, hairline and distinctive moles.
For stricter control, use a mask or healing brush and check its actual affected area. An instruction to “keep everything unchanged” does not replace that comparison.
Can Google Photos remove pimples?
Google announced Android portrait touch-up tools including Heal in April 2026. The official update specifies Android 9 or later and at least 4 GB of RAM, with face selection, tools and adjustable intensity.
Availability is gradual, so check the menus on your device; that announcement does not establish identical iPhone availability. Magic Eraser is also a separate entry point from dedicated portrait touch-up.
Can I do this on my phone?
You can upload the original in a mobile browser, paste the editing prompt and save the result. Zoom in before keeping it: a small preview can hide a heavy retouch.
For individual pimples, Lightroom mobile’s Heal tool is another option. Adjust brush size, feather and opacity to suit the spot without brushing over the edge of a mouth, nostril or eyebrow.
Can it edit flat marks and pitted-looking scars too?
An editor can change their appearance in a photo, but specify the tasks separately: remove raised red spots, fade flat marks or alter uneven texture. “Remove all blemishes” blurs those distinctions.
Example 8 removes pimples while keeping flat marks. These are changes to a photograph, not skin treatment or evidence that a skincare product works.
How do I keep freckles and beauty marks?
Name the feature and its location, such as “keep the dark mole below the outer corner of the eye.” When a pimple sits immediately beside it, a small healing brush gives you more direct control.
Adobe Camera Raw’s blemish-removal instructions distinguish Amount, which controls temporary blemish removal, from Fade, which fades moles and freckles. Fade is not a protection switch; Restore can bring back a removed mark.
Can I use these prompts directly on video?
We tested still photographs. Video also requires the repair to follow the face, with checks for flicker and drifting texture during turns, speech and lighting changes.
Use a video tool with tracking and frame-by-frame review. A convincing frame does not guarantee a stable clip.
Could an uploaded private photo become public?
Check visibility before uploading. Promptsref’s privacy and content-visibility policy says it processes prompts, uploads and outputs; subscribers can choose publication per generation, while free or pay-as-you-go creations may appear on public surfaces.
Get permission before editing someone else’s portrait, and confirm that your account and settings meet their privacy needs. Our examples use fictional adults, with no reader or Reddit contributor’s photographs.