

AIを使って魅力的な短編映画を作成する方法
このガイドでは、AIツールを使って高品質な短編映画を作成する手順をステップバイステップで説明します。シンプルな参考画像から始め、Nano Banana Pro、Kling AI、CapCutなどの強力なツールを活用して、一貫したストーリーと視覚的な魅力を構築できます。この手法はAIコミュニティの創造的なアイデアから生まれ、一般のクリエイターが、高価な機材や大規模なチームなしでプロレベルの作品を簡単に制作できるようにします。
1. 起源と完成品のショーケース
この方法のインスピレーションは、XプラットフォームのAI愛好家コミュニティから来ています。最初に、ユーザー@techhallaがNano Banana Pro向けの2つのプロンプトを共有しました。これらはアップロードした画像を映画風のグリッドストーリーボードに変換し、フレームを抽出してビデオを作成できるものです。Higgsfield AIを例に挙げ、これらのプロンプトでストーリーボードを素早く構築する方法を示しました。しかし、元のプロンプトでは異なるカメラアングルからフレームが生成されることが多く、最終編集時の連続性が悪く、スムーズなシーケンスを形成しにくい問題がありました。
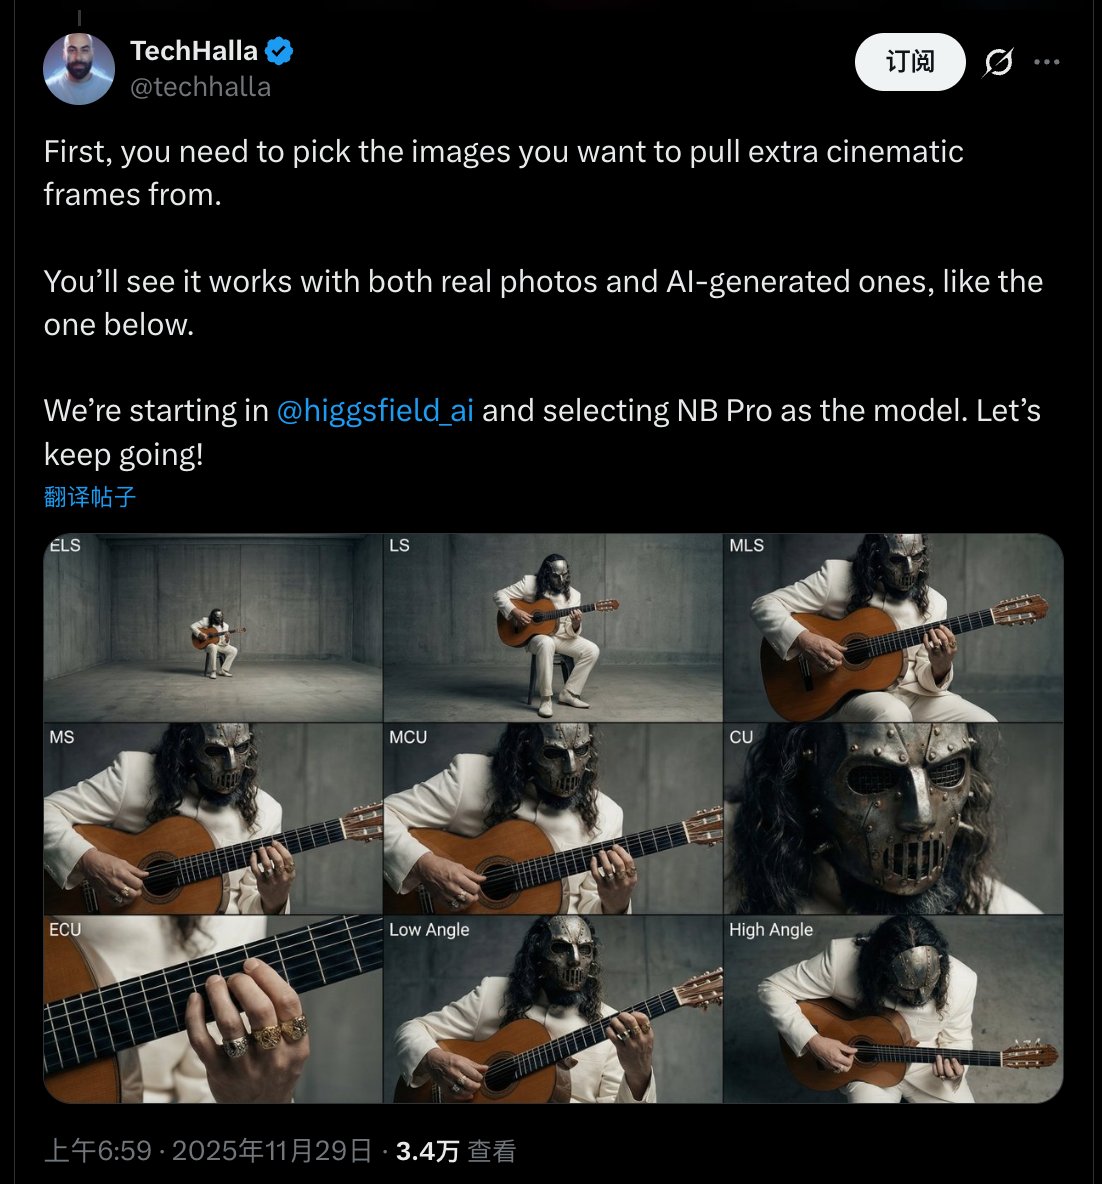
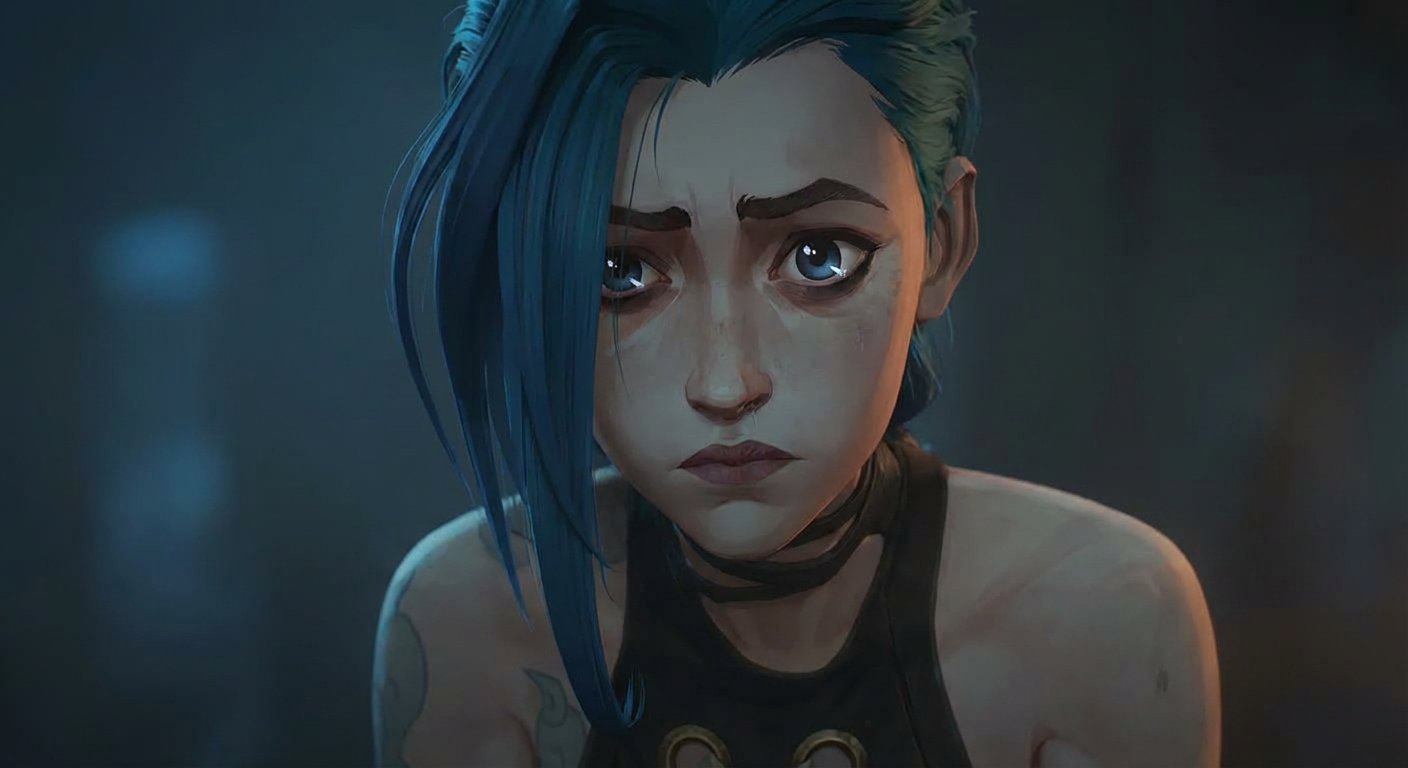
その後、このウェブサイトの創設者であるUnderwoodが、これらのプロンプトを巧みに最適化しました。同じシーンとストーリーラインの下でキーフレームを拡張することを強調し、より高い連続性を確保しています。彼の投稿は2025年11月30日と12月1日に公開され、すぐに50万回以上の閲覧と数千のインタラクションを集めました。Underwoodは複数のテストケースを共有しており、Game of Thrones風のドラゴンシーン、Harry Potterの魔法決闘、Lord of the Ringsの壮大な要素、Zelda風の冒険ショットなどが含まれます。これらのストーリーボードは、AIが単一の画像から9〜12の連続したキーフレームを生成し、それらを10〜20秒の短いシーケンスに組み合わせる様子を鮮やかに示しています。以下は、純粋にAIで作られた短編映画の例で、キーフレームから最終製品までのプロセスを完全に展示しています。
2. 作り方
以下は、無料またはサブスクリプションベースのAIツールを使って完了できる詳細な運用プロセスです。参考画像(例: 映画のスクリーンショットやオリジナル画像)を準備していると仮定し、10〜20秒の短編映画を作成することを目標とします。
2.1. Nano Bananaでキーフレームを生成

まず、Nano Banana Pro(Gemini 3 Proベースの画像生成ツール)を使ってストーリーボードを作成します。このステップの核心は、Underwoodが提供した最適化されたプロンプトで、参考画像を連続したキーフレームのシーケンスに拡張することです。
-
手順:
- Nano Banana Proにアクセス(Geminiや関連プラットフォーム経由)。
- 参考画像をアップロード。
- 最適化されたプロンプトを入力(以下はUnderwoodが提供した完全版):
<role> You are an award-winning trailer director + cinematographer + storyboard artist. Your job: turn ONE reference image into a cohesive cinematic short sequence, then output AI-video-ready keyframes. </role> <input> User provides: one reference image (image). </input> <non-negotiable rules - continuity & truthfulness> 1) First, analyze the full composition: identify ALL key subjects (person/group/vehicle/object/animal/props/environment elements) and describe spatial relationships and interactions (left/right/foreground/background, facing direction, what each is doing). 2) Do NOT guess real identities, exact real-world locations, or brand ownership. Stick to visible facts. Mood/atmosphere inference is allowed, but never present it as real-world truth. 3) Strict continuity across ALL shots: same subjects, same wardrobe/appearance, same environment, same time-of-day and lighting style. Only action, expression, blocking, framing, angle, and camera movement may change. 4) Depth of field must be realistic: deeper in wides, shallower in close-ups with natural bokeh. Keep ONE consistent cinematic color grade across the entire sequence. 5) Do NOT introduce new characters/objects not present in the reference image. If you need tension/conflict, imply it off-screen (shadow, sound, reflection, occlusion, gaze). </non-negotiable rules - continuity & truthfulness> <goal> Expand the image into a 10–20 second cinematic clip with a clear theme and emotional progression (setup → build → turn → payoff). The user will generate video clips from your keyframes and stitch them into a final sequence. </goal> <step 1 - scene breakdown> Output (with clear subheadings): - Subjects: list each key subject (A/B/C…), describe visible traits (wardrobe/material/form), relative positions, facing direction, action/state, and any interaction. - Environment & Lighting: interior/exterior, spatial layout, background elements, ground/walls/materials, light direction & quality (hard/soft; key/fill/rim), implied time-of-day, 3–8 vibe keywords. - Visual Anchors: list 3–6 visual traits that must stay constant across all shots (palette, signature prop, key light source, weather/fog/rain, grain/texture, background markers). </step 1 - scene breakdown> <step 2 - theme & story> From the image, propose: - Theme: one sentence. - Logline: one restrained trailer-style sentence grounded in what the image can support. - Emotional Arc: 4 beats (setup/build/turn/payoff), one line each. </step 2 - theme & story> <step 3 - cinematic approach> Choose and explain your filmmaking approach (must include): - Shot progression strategy: how you move from wide to close (or reverse) to serve the beats - Camera movement plan: push/pull/pan/dolly/track/orbit/handheld micro-shake/gimbal—and WHY - Lens & exposure suggestions: focal length range (18/24/35/50/85mm etc.), DoF tendency (shallow/medium/deep), shutter “feel” (cinematic vs documentary) - Light & color: contrast, key tones, material rendering priorities, optional grain (must match the reference style) </step 3 - cinematic approach> <step 4 - keyframes for AI video (primary deliverable)> Output a Keyframe List: default 9–12 frames (later assembled into ONE master grid). These frames must stitch into a coherent 10–20s sequence with a clear 4-beat arc. Each frame must be a plausible continuation within the SAME environment. Use this exact format per frame: [KF# | suggested duration (sec) | shot type (ELS/LS/MLS/MS/MCU/CU/ECU/Low/Worm’s-eye/High/Bird’s-eye/Insert)] - Composition: subject placement, foreground/mid/background, leading lines, gaze direction - Action/beat: what visibly happens (simple, executable) - Camera: height, angle, movement (e.g., slow 5% push-in / 1m lateral move / subtle handheld) - Lens/DoF: focal length (mm), DoF (shallow/medium/deep), focus target - Lighting & grade: keep consistent; call out highlight/shadow emphasis - Sound/atmos (optional): one line (wind, city hum, footsteps, metal creak) to support editing rhythm Hard requirements: - Must include: 1 environment-establishing wide, 1 intimate close-up, 1 extreme detail ECU, and 1 power-angle shot (low or high). - Ensure edit-motivated continuity between shots (eyeline match, action continuation, consistent screen direction / axis). </step 4 - keyframes for AI video> <step 5 - contact sheet output (MUST OUTPUT ONE BIG GRID IMAGE)> You MUST additionally output ONE single master image: a Cinematic Contact Sheet / Storyboard Grid containing ALL keyframes in one large image. - Default grid: 3x3. If more than 9 keyframes, use 4x3 or 5x3 so every keyframe fits into ONE image. Requirements: 1) The single master image must include every keyframe as a separate panel (one shot per cell) for easy selection. 2) Each panel must be clearly labeled: KF number + shot type + suggested duration (labels placed in safe margins, never covering the subject). 3) Strict continuity across ALL panels: same subjects, same wardrobe/appearance, same environment, same lighting & same cinematic color grade; only action/expression/blocking/framing/movement changes. 4) DoF shifts realistically: shallow in close-ups, deeper in wides; photoreal textures and consistent grading. 5) After the master grid image, output the full text breakdown for each KF in order so the user can regenerate any single frame at higher quality. </step 5 - contact sheet output> <final output format> Output in this order: A) Scene Breakdown B) Theme & Story C) Cinematic Approach D) Keyframes (KF# list) E) ONE Master Contact Sheet Image (All KFs in one grid) </final output format> - ストーリーボードを生成: AIが3x3または類似のグリッド画像を出力し、各セルがキーフレームとなり、KF#、継続時間、ショットタイプなどのラベルが付きます。
-
Tips: プロンプトが長すぎる場合、スクリーンショットを撮って入力可能。テスト時は明確な参考画像を選び、AIが無関係な要素を導入しないようにする。
2.2. Klingの「スタート/エンドフレーム参照」でトランジションを埋める
まず、各キーフレームの高解像度画像を取得し、ビデオの開始フレームと終了フレームとして使用します。例えば、Nano Banana Proを使って「行x、フレームxの画像内容を抽出して黒い縁を取り除く」といったプロンプトでこれらを抽出できます。
次に、Kling AIを使ってキーフレーム間のトランジションを埋め、一貫したビデオセグメントを生成します。Klingはスタート/エンドフレーム参照をサポートし、中間コンテンツを自動的に作成します。
-
手順:
- Kling AIのクリエイティブインターフェースにアクセス。
- 「Start & End Frames」アイコンをクリックし、ストーリーボードの最初のフレームをスタートとして、最後のフレームをエンドとしてアップロード。
- プロンプトを入力: 例「[スタートフレームの説明]から始め、[エンドフレームの説明]で終わる。[変化の詳細を追加、例: キャラクターの動作やカメラ移動]」。例えば、「ドラゴンが戦士を見下ろすところから始め、戦士が剣を抜いて突進するところで終わる。ショットをゆっくりプッシュインし、雪の霧効果を追加。」
- 任意でビデオ継続時間を設定(3〜10秒)。
- ビデオを生成: Klingがプロンプトに基づいてトランジションを作成し、全体の連続性を確保。
-
Tips: 詳細な説明を追加して精度を向上、例「同じ照明と雰囲気を維持」。複数の被写体がある場合、追加の参考画像をアップロード(最大7枚)。このツールは画像とビデオの混合参照をサポート。
この投稿では、各セグメント生成の実際の操作が詳細に記載されています。
2.3. CapCutで編集と洗練
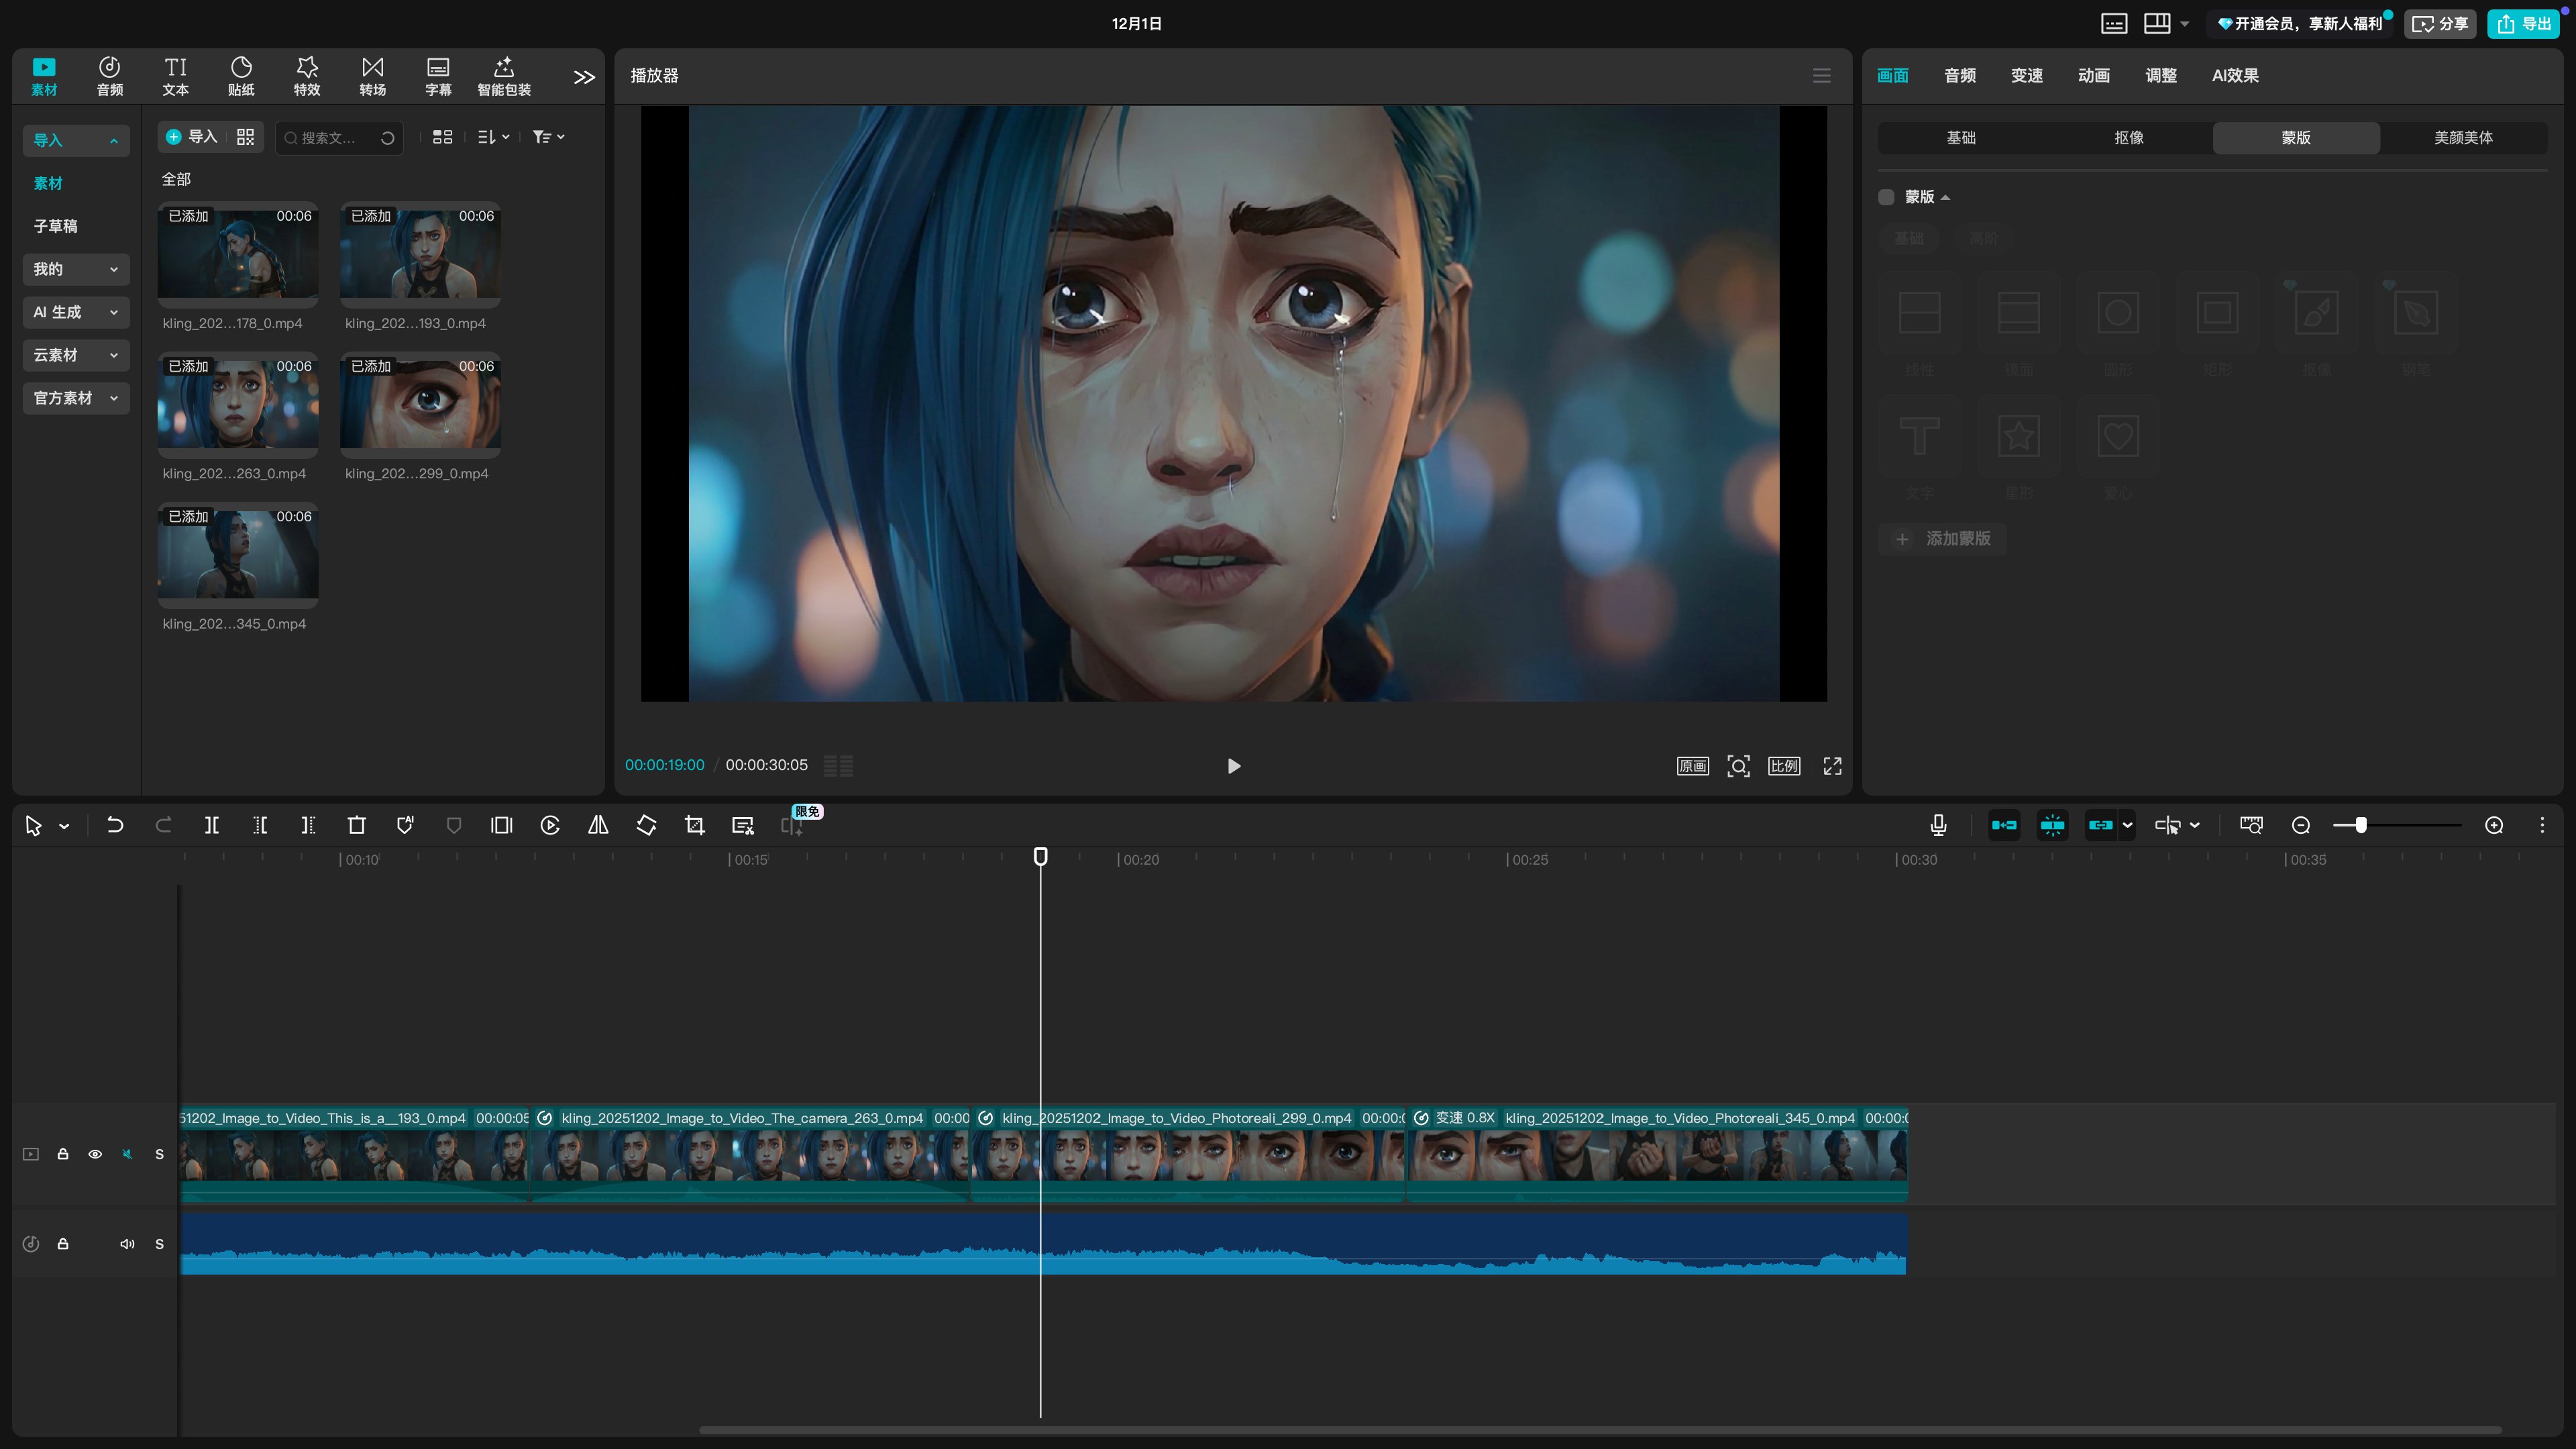
最後に、CapCutを使ってビデオを修正し、最終編集を行います。CapCutは無料のAIビデオエディターで、スクリプトからコンテンツを生成でき、AI生成セグメントを簡単に最適化できます。
-
手順:
- CapCutをダウンロードして開く(デスクトップまたはモバイル版対応)。
- Klingで生成したビデオセグメントをインポート。
- ツールを使用: セグメントをアップロードし、テンプレートを選択するかスクリプトを入力して自動編集(トランジションや効果の追加など)。
- 手動修正: タイムラインを調整、音楽、テキスト、効果を追加、または不整合部分をトリム。AIボイス機能を使ってナレーションを生成またはオーディオを置き換え。
- エクスポート: 高解像度を選択して最終短編映画を生成。
-
Tips: AI生成に欠陥(不自然な動きなど)がある場合、CapCutの安定化や速度調整で修正。複数のKlingセグメントを完全な短編映画に繋げる際は、ペースの一貫性に注意。
3. 制作プロセスでの課題と洞察
実際の操作ではいくつかの課題に直面するかもしれませんが、それらはしばしば深い洞察を生み出します。コミュニティのユーザー反馈によると、共通の問題にはプロンプトの文脈汚染、音楽同期の難しさ、トランジションの手動介入の必要性があります。具体的に:
- AIにストーリー主導のビジュアルを生成させる方法: プロンプトにキャラクターの関係性とナラティブの意図を組み込み、浅い出力のを避ける。また、プロンプトの文脈汚染を防ぐ—AIの応答が不安定な場合、新しい会話を開始してキーフレームを再抽出、一貫性を確保。
- 映画言語でプロンプトを書く: ショットタイプ、移動、構成の変化を明確に指定し、トランジションをスムーズにし、プロフェッショナリズムを高める。Kling生成時、トランジションのギャップがある場合、詳細な説明で最適化(例「ゆっくりプッシュインし、雰囲気を維持」)、しかし最終的には人間の直感による微調整が必要。
- 編集が品質の真の限界: ショットの組み合わせ、ペース制御、感情の構築、オーディオビジュアルの同期はすべてポストプロダクションに依存し、最終的な成否を決める。特に背景音楽を追加する際、ビートの同期は手動介入が必要で、現在のAIツールでは完全に置き換えられない。CapCutを使って速度とトランジションを手動調整し、シームレスな接続を実現することをおすすめ。
まとめると、AI短編映画制作は脚本、監督、編集が絡み合うシンフォニーのようなもので、技術の魔法と人間のインスピレーションを完璧に融合させます。ストーリーの脈動を巧みに掴み、ショットの詩情を表現し、すべてのビートのリズムを精密にコントロールできれば、最終製品は想像を超えた輝きを放つでしょう。このプロセスは伝統的な創作の枷を打破するだけでなく、無限の創造性への入口となり、すべての夢想家を探索の旅に誘います。


